
User Manual


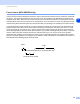
Table Of Contents
- Network USER’S GUIDE
- Table of contents
- 1 Introduction
- 2 Configuring your network printer
- Overview
- IP addresses, subnet masks and gateways
- Setting the IP address and subnet mask
- Changing the print server settings
- 3 Control Panel Setup
- LAN Main Setup Menu
- Setup TCP/IP
- Ethernet
- Setup I-Fax (MFC-8860DN only)
- Setup Mail RX (MFC-8860DN only)
- Setup Mail TX (MFC-8860DN only)
- Setup Relay (MFC-8860DN only)
- Scan to E-mail (E-mail server) (MFC-8860DN only)
- Scan to FTP
- Fax to Server (MFC-8860DN only)
- Time Zone (MFC-8860DN only)
- Restoring the network settings to factory default
- Printing the Network Configuration List
- LAN Main Setup Menu
- 4 Network printing from Windows® basic TCP/IP Peer-to-Peer printing
- 5 Internet printing for Windows®
- Overview
- Quick Tips
- Brother Internet Print General Information
- Brother Internet Print: Configuring the Brother Print Server
- Brother Internet Print: Using the BRAdmin Professional utility to Configure the Print Server
- Brother Internet Print: Using a Web Browser to Configure the Print Server
- Brother Internet Print: Installing the BIP software on Windows® 98/Me/2000/XP and Windows NT® 4.0
- Adding a Second Brother Internet Port
- Windows® 2000/XP IPP printing
- Specifying a different URL
- Other sources of information
- Overview
- 6 Network printing from a Macintosh®
- 7 Web Based Management
- 8 LDAP Operation (MFC-8860DN only)
- 9 Internet FAX (MFC-8860DN only)
- Overview
- Getting Connected
- Control Panel Key Functions
- Sending an Internet Fax
- Manually Entering Text
- Receiving E-mail or Internet Fax
- Receiving an Internet Fax to a PC
- Forwarding Received E-mail and Fax Messages
- Relay Broadcasting
- TX Verification Mail
- Setup Mail (TX)
- Setup Mail (RX)
- Error mail
- Important information on Internet Fax
- Overview
- 10 Troubleshooting
- Appendix A
- Using services
- Other ways to set the IP address (for advanced users and Administrators)
- Using DHCP to configure the IP address
- Using BOOTP to configure the IP address
- Using RARP to configure the IP address
- Using APIPA to configure the IP address
- Using ARP to configure the IP address
- Using the TELNET console to configure the IP address
- Using the Brother Web BRAdmin server software for IIS* to configure the IP address
- Installation when using a Network Print Queue or Share (printer driver only)
- Multi-function Print Server specifications
- Function Table and Default Factory Settings
- Entering Text
- Index

Control Panel Setup
28
3
Fax to Server (MFC-8860DN only)
The Fax to Server feature allows the machine to scan a document and send it over the network to a separate
fax server. The document will then be sent from the server as fax data to the destination fax number over
standard phone lines. When the Fax to Server feature is set to ON all automatic fax transmissions from the
machine will be sent to the fax server for fax transmission. You can continue to send a fax directly from the
machine using the manual fax feature (For more information, see sending a fax manually in the User’s Guide).
To send a document to the fax server the correct syntax for that server must be used. The destination fax
number must be sent with a prefix and a suffix that match the parameters used by the fax server. In most
cases the syntax for the prefix is “fax=” and the syntax for the suffix would be the domain name of the fax
server E-mail gateway. The suffix must also include the “@” symbol at the beginning of the suffix. The prefix
and the suffix information must be stored in the machine before you can use the fax to server function.
Destination fax numbers can be saved in the One-Touch or Speed Dial locations or entered using the dial
pad (up to 20 digit numbers). For example if you wanted to send a document to a destination fax number of
123-555-0001 the following syntax would be used.
fax=123-555-0001@faxserver.companyname.com
Prefix
Suffix
Destination fax number