
User Manual

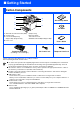
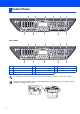

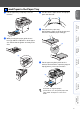
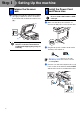

Table Of Contents
- Quick Setup Guide MFC-8460N/8860DN
- Getting Started
- Table of Contents
- Step1 Setting Up the machine
- Step2 Installing the Drivers & Software
- Supplied CD-ROM “MFL-Pro Suite”
- For USB Interface Cable Users (For Windows® 98/98SE/Me/2000 Professional/XP/XP Professional x64 Edition)
- For Parallel Interface Cable Users (For Windows® 98/98SE/Me/2000 Professional/XP/XP Professional x64 Edition)
- For Windows NT® Workstation Version 4.0 Users
- For Network Interface Cable Users (For Windows® 98/98SE/Me/NT/2000 Professional/XP/XP Professional x64 Edition)
- For USB Interface Cable Users
- For USB Interface Cable Users
- For Network Users and Administrators
- Options and Consumables
- Brother ENG

6
1 Push the lever (1) up to unlock the scanner.
(The gray scanner lock lever is located at
the back left side, under the document cover
(2).)
Damage caused to your machine by
failure to lock the scanner before
packing and shipping may void your
warranty.
Do not connect the Parallel or USB
cable yet.
1 Make sure that the power switch is off.
Connect the AC power cord to the machine.
2 Plug the AC power cord into an AC outlet.
Turn the power switch on.
3 Connect one end of the telephone line cord
to the socket on the machine marked LINE
and the other end to a modular wall socket.
3
Release the Scanner
Lock
(2)
(1)
4
Install the Power Cord
and Phone Line
If Scanner Locked appears on the LCD,
immediately release the scanner lock and
press Stop/Exit.
Step 1
Setting Up the machine