
User Manual
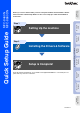

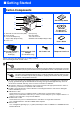
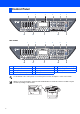
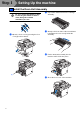
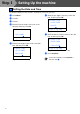
Table Of Contents
- Quick Setup Guide MFC-8460N/MFC-8860DN
- Getting Started
- Table of Contents
- Step1 Setting Up the machine
- 1 Install the Drum Unit Assembly
- 2 Load Paper in the Paper Tray
- 3 Release the Scanner Lock
- 4 Install the Power Cord and Phone Line
- 5 Set Your Country (For Australia / New Zealand Customer Only)
- 6 Setting the Date and Time
- 7 Setting your Station ID
- 8 Tone and Pulse dialling mode (not available for New Zealand)
- 9 Selecting a Receive Mode
- 10 Setting the LCD Contrast
- Step2 Installing the Drivers & Software
- Supplied CD-ROM “MFL-Pro Suite”
- For USB Interface Cable Users (For Windows® 98/98SE/Me/2000 Professional/XP/XP Professional x64 Edition)
- For Parallel Interface Cable Users (For Windows® 98/98SE/Me/2000 Professional/XP/XP Professional x64 Edition)
- For Windows NT® Workstation Version 4.0 Users
- For Network Interface Cable Users (For Windows® 98/98SE/Me/NT/2000 Professional/XP/XP Professional x64 Edition)
- For USB Interface Cable Users
- For Network Interface Cable Users
- For Network Users and Administrators
- Options and Consumables
- brother ARL/ASA/NZ

4
Setting Up the machine
Do not connect the interface cable.
Connecting the interface cable is
done during the software
installation process.
1
Open the front cover by pressing the front
cover (1) release button.
2
Unpack the drum unit and toner cartridge
assembly.
3
Gently rock it from side to side several times
to distribute the toner evenly inside the
assembly.
4
Put the drum unit assembly into the
machine until it clicks into place.
5
Close the front cover of the machine.
1 Install the Drum Unit Assembly
(1)
Step 1