
User Manual
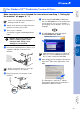
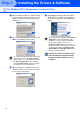
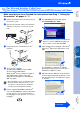
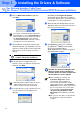
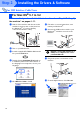
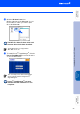
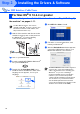
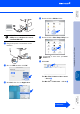
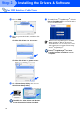
Table Of Contents
- Quick Setup Guide MFC-8460N/MFC-8860DN
- Getting Started
- Table of Contents
- Step1 Setting Up the machine
- 1 Install the Drum Unit Assembly
- 2 Load Paper in the Paper Tray
- 3 Release the Scanner Lock
- 4 Install the Power Cord and Phone Line
- 5 Set Your Country (For Australia / New Zealand Customer Only)
- 6 Setting the Date and Time
- 7 Setting your Station ID
- 8 Tone and Pulse dialling mode (not available for New Zealand)
- 9 Selecting a Receive Mode
- 10 Setting the LCD Contrast
- Step2 Installing the Drivers & Software
- Supplied CD-ROM “MFL-Pro Suite”
- For USB Interface Cable Users (For Windows® 98/98SE/Me/2000 Professional/XP/XP Professional x64 Edition)
- For Parallel Interface Cable Users (For Windows® 98/98SE/Me/2000 Professional/XP/XP Professional x64 Edition)
- For Windows NT® Workstation Version 4.0 Users
- For Network Interface Cable Users (For Windows® 98/98SE/Me/NT/2000 Professional/XP/XP Professional x64 Edition)
- For USB Interface Cable Users
- For Network Interface Cable Users
- For Network Users and Administrators
- Options and Consumables
- brother ARL/ASA/NZ

27
DO NOT connect the machine to a
USB port on a keyboard or a non-
powered USB hub.
8
Plug in the power cord and turn on the
machine.
9
Choose USB and then click OK.
0
Click GO, then choose Application.
A
Double-click the Utilities folder.
B
Double-click the Print Setup Utility icon.
C
Click Add.
For Mac OS
®
X 10.2.4 to 10.3.x users
➝
Go to
D
For Mac OS
®
X 10.4 users
➝
Go to
E
For Mac OS
®
X 10.2.x users, open Print
Center icon.
Continued ...
Installing the Drivers & Software
Setting Up
the machine
Macintosh
®
USB
Network
Administrators