
User Manual
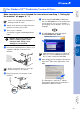
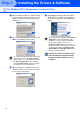
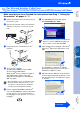
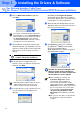
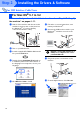
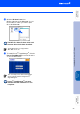
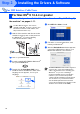
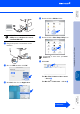
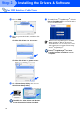
Table Of Contents
- Quick Setup Guide MFC-8460N/MFC-8860DN
- Getting Started
- Table of Contents
- Step1 Setting Up the machine
- 1 Install the Drum Unit Assembly
- 2 Load Paper in the Paper Tray
- 3 Release the Scanner Lock
- 4 Install the Power Cord and Phone Line
- 5 Set Your Country (For Australia / New Zealand Customer Only)
- 6 Setting the Date and Time
- 7 Setting your Station ID
- 8 Tone and Pulse dialling mode (not available for New Zealand)
- 9 Selecting a Receive Mode
- 10 Setting the LCD Contrast
- Step2 Installing the Drivers & Software
- Supplied CD-ROM “MFL-Pro Suite”
- For USB Interface Cable Users (For Windows® 98/98SE/Me/2000 Professional/XP/XP Professional x64 Edition)
- For Parallel Interface Cable Users (For Windows® 98/98SE/Me/2000 Professional/XP/XP Professional x64 Edition)
- For Windows NT® Workstation Version 4.0 Users
- For Network Interface Cable Users (For Windows® 98/98SE/Me/NT/2000 Professional/XP/XP Professional x64 Edition)
- For USB Interface Cable Users
- For Network Interface Cable Users
- For Network Users and Administrators
- Options and Consumables
- brother ARL/ASA/NZ

22
9
Choose Network Connection and then
click Next.
0
The installation of the Brother drivers will
automatically start. The installation screens
appear one after another. Please wait, it will
take a few seconds for all the screens to
appear.
DO NOT try to cancel any of the
screens during this installation.
A
If the machine is configured for your
network, select your machine from the list
and then click Next.
B
If the machine is not yet configured for use
on your network, the following screen
appears.
Click OK. The Configure IP Address
window will appear. Enter the IP address
information appropriate to your network by
following the on-screen instructions.
C
When the On-Line Registration screen is
displayed, make your selection and follow
the on-screen instructions.
D
Click Finish to restart your computer.
(For Windows
®
2000 Professional/XP/
XP Professional x64 Edition/
Windows NT
®
4.0, you must be logged on
with Administrator rights.)
The MFL-Pro Suite (including Brother
Network Printer driver and Network
Scanner driver) has been installed and
the installation is now complete.
For Network Interface Cable Users
(For Windows
®
98/98SE/Me/NT/2000 Professional/XP/XP Professional
x64
Edition)
If you want to install the PS driver (Brother’s
BR-Script Driver), choose Custom Install and
then follow the on-screen instructions. When
the Select Components screen appears,
check PS Printer Driver, and then continue
following the on-screen instructions.
This window will not appear if there is only one
of this Brother model connected on the
network, it will be selected automatically.
■ After restarting the computer, the
Installation Diagnostics will run
automatically. If the installation is
unsuccessful, the installation results
window will be shown. If the Installation
Diagnostics shows a failure, please follow
the on-screen instruction or read on-line
help and FAQ’s in Start/All Programs
(Programs)/Brother/MFL-Pro Suite
MFC-XXXX (where XXXX is your model
name).
■ Once you are sure that you can print after
the installation, restart your Firewall
software.
Step 2
Installing the Drivers & Software