
User Manual
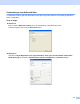
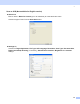
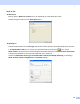

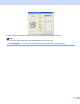

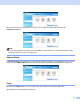


Table Of Contents
- SOFTWARE USER’S GUIDE MFC-8460N MFC-8860DN DCP-8060
- Table of Contents
- Section I Windows®
- 1 Printing
- Using the Brother printer driver
- Printing a document
- Duplex (two-sided) printing
- Simultaneous scanning, printing and faxing
- Printer operation key
- Status Monitor
- Printer driver settings (For Windows®)
- How to access the printer driver settings (For Windows®)
- Features in the Windows® printer driver
- Features in BR-Script3 (Post Script® 3™ language emulation) Printer compatible driver
- 2 Scanning
- 3 ControlCenter2
- 4 Network Scanning (For models with built-in network support)
- 5 Remote Setup (Not available for DCP model)
- 6 Brother PC-FAX Software (Not available for DCP model)
- PC-FAX sending
- Speed Dial setup
- Registering an address in a Speed Dial button
- Clearing a Speed Dial button
- Brother Address Book
- Setting up a member in the Address Book
- Setting up a group for broadcasting
- Editing member information
- Deleting a member or group
- Exporting the Address Book
- Importing to the Address Book
- Sending a file as a PC-FAX using the Facsimile style user interface
- Sending a file as a PC-FAX using the Simple style user interface
- PC-FAX receiving
- 1 Printing
- Section II Apple® Macintosh®
- 7 Printing and Faxing
- 8 Scanning
- 9 ControlCenter2
- 10 Network Scanning (Not available for DCP- 8060)
- 11 Remote Setup (Not available for DCP model)
- Index
- Brother ENG

3.
72
When the PC-FAX receiving software is running, you can open the viewer application with the
View Received button.
Note
You can also activate the PC-FAX receiving software from the start menu. (See Running the PC-FAX
receiving software on your PC on page 103.)
Address Book 3
The Address Book button allows you to add, amend or delete contacts from your address book. To edit this
button, click the Address Book button to open the dialog box. (See Brother Address Book on page 95.)
Setup 3
By clicking the Setup button, you can configure the user settings of the PC-FAX application.
(See Setting up user information on page 90.)