
User Manual
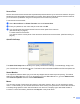
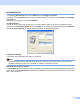

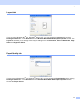
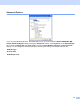
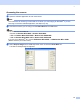
Table Of Contents
- SOFTWARE USER’S GUIDE MFC-8460N MFC-8860DN DCP-8060
- Table of Contents
- Section I Windows®
- 1 Printing
- Using the Brother printer driver
- Printing a document
- Duplex (two-sided) printing
- Simultaneous scanning, printing and faxing
- Printer operation key
- Status Monitor
- Printer driver settings (For Windows®)
- How to access the printer driver settings (For Windows®)
- Features in the Windows® printer driver
- Features in BR-Script3 (Post Script® 3™ language emulation) Printer compatible driver
- 2 Scanning
- 3 ControlCenter2
- 4 Network Scanning (For models with built-in network support)
- 5 Remote Setup (Not available for DCP model)
- 6 Brother PC-FAX Software (Not available for DCP model)
- PC-FAX sending
- Speed Dial setup
- Registering an address in a Speed Dial button
- Clearing a Speed Dial button
- Brother Address Book
- Setting up a member in the Address Book
- Setting up a group for broadcasting
- Editing member information
- Deleting a member or group
- Exporting the Address Book
- Importing to the Address Book
- Sending a file as a PC-FAX using the Facsimile style user interface
- Sending a file as a PC-FAX using the Simple style user interface
- PC-FAX receiving
- 1 Printing
- Section II Apple® Macintosh®
- 7 Printing and Faxing
- 8 Scanning
- 9 ControlCenter2
- 10 Network Scanning (Not available for DCP- 8060)
- 11 Remote Setup (Not available for DCP model)
- Index
- Brother ENG

1.
27
Print Date & Time 1
When enabled the Print Date & Time feature, it will print the date and time on your document from your
computer’s system clock.
Click the Setting button to change the Date, Time, Position and Font. To include a background with the
Date and Time, choose Opaque. When Opaque is selected, you can set the darkness of the Date and Time
background by changing the percentage.
Note
The Date and Time in the selection box shows the format that will be printed. The actual Date and Time
printed on your document is automatically retrieved from the settings of your computer.
Density adjustment 1
Increase or decrease the print density.