
User Manual
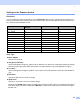

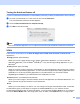
Table Of Contents
- SOFTWARE USER’S GUIDE MFC-8460N MFC-8860DN DCP-8060
- Table of Contents
- Section I Windows®
- 1 Printing
- Using the Brother printer driver
- Printing a document
- Duplex (two-sided) printing
- Simultaneous scanning, printing and faxing
- Printer operation key
- Status Monitor
- Printer driver settings (For Windows®)
- How to access the printer driver settings (For Windows®)
- Features in the Windows® printer driver
- Features in BR-Script3 (Post Script® 3™ language emulation) Printer compatible driver
- 2 Scanning
- 3 ControlCenter2
- 4 Network Scanning (For models with built-in network support)
- 5 Remote Setup (Not available for DCP model)
- 6 Brother PC-FAX Software (Not available for DCP model)
- PC-FAX sending
- Speed Dial setup
- Registering an address in a Speed Dial button
- Clearing a Speed Dial button
- Brother Address Book
- Setting up a member in the Address Book
- Setting up a group for broadcasting
- Editing member information
- Deleting a member or group
- Exporting the Address Book
- Importing to the Address Book
- Sending a file as a PC-FAX using the Facsimile style user interface
- Sending a file as a PC-FAX using the Simple style user interface
- PC-FAX receiving
- 1 Printing
- Section II Apple® Macintosh®
- 7 Printing and Faxing
- 8 Scanning
- 9 ControlCenter2
- 10 Network Scanning (Not available for DCP- 8060)
- 11 Remote Setup (Not available for DCP model)
- Index
- Brother ENG

8.
127
Adjusting the Image 8
Brightness
Adjust the setting (-50 to 50) to get the best image. The default value is 0, representing an average.
You can set the Brightness level by dragging the slide bar to the right or left to lighten or darken the image.
You can also enter a value in the box to set the level.
If the scanned image is too light, set a lower Brightness level and scan the document again.
If the image is too dark, set a higher Brightness level and scan the document again.
Contrast
You can increase or decrease the contrast level by moving the slide bar to the left or right. An increase
emphasizes dark and light areas of the image, while a decrease reveals more detail in grey areas. You
can also enter a value in the box to set the Contrast.
Note
The Contrast setting is only available when Grey or True Grey is chosen.