
User Manual
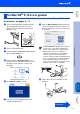
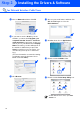
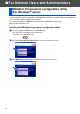

Table Of Contents
- Quick Setup Guide MFC-8460N/MFC-8860DN
- Getting Started
- Table of Contents
- Step1 Setting Up the machine
- 1 Install the Drum Unit Assembly
- 2 Load Paper in the Paper Tray
- 3 Release the Scanner Lock
- 4 Install the Power Cord and Phone Line
- 5 Setting the Date and Time
- 6 Setting your Station ID
- 7 Selecting a Receive Mode
- 8 Tone and Pulse dialing mode (Canada only)
- 9 Selecting Your Language (Canada only)
- 10 Setting the LCD Contrast
- 11 Sending in the Product Registration and Test Sheet (USA Only)
- Step2 Installing the Drivers & Software
- Supplied CD-ROM “MFL-Pro Suite”
- For USB Interface Cable Users (For Windows® 98/98SE/Me/2000 Professional/XP/XP Professional x64 Edition)
- For Parallel Interface Cable Users (For Windows® 98/98SE/Me/2000 Professional/XP/XP Professional x64 Edition)
- For Windows NT® Workstation Version 4.0 Users
- For Network Interface Cable Users (For Windows® 98/98SE/Me/NT/2000 Professional/XP/XP Professional x64 Edition)
- For USB Interface Cable Users
- For Network Interface Cable Users
- For Network Users and Administrators
- Options and Consumables
- brother USA/CAN

35
Setting your IP Address, Subnet Mask and Gateway using BRAdmin
Professional
1
Start BRAdmin Professional, and select
TCP/IP.
2
Click Devices, then choose Search Active
Devices.
BRAdmin will search for new devices
automatically.
3
Double-click the new device.
4
Enter the IP Address, Subnet Mask and
Gateway, and then click the OK button.
5
The address information will be saved to the
machine.
The default password for the print server is
“access”. You can use BRAdmin
Professional or a web browser to change this
password.
For more information on network
administration, please see the Network
User’s Guide in the programs menu or go to
http://solutions.brother.com
Setting Up
the machine
Windows
®
USB
Windows
®
Parallel
Windows
NT
®
4.0
Parallel
Macintosh
®
USB
Macintosh
®
Network
Windows
®
Network
Network
Administrators