
User Manual
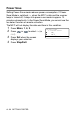
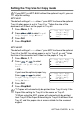
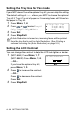
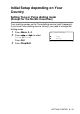

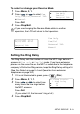

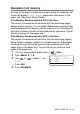
Table Of Contents
- USER'S GUIDE MFC-8440 MFC-8840D
- APPROVAL INFORMATION
- Compilation and Publication Notice
- "EC"Declararion of Conformity
- Safety precautions
- Choosing a location
- Quick Reference Guide
- Table of Contents
- 1 Introduction
- 2 Paper
- 3 On-screen programming
- 4 Getting started
- Initial Setup
- General Setup
- Setting the Mode Timer
- Setting the Paper Type
- Setting the Paper Size
- Setting the Ring Volume
- Setting the Beeper Volume
- Setting the Speaker Volume
- Turning on Automatic Daylight Savings Time
- Toner Save
- Sleep Time
- Turning off the Scanner Lamp
- Power Save
- Setting the Tray Use for Copy mode
- Setting the Tray Use for Fax mode
- Setting the LCD Contrast
- Initial Setup depending on Your Country
- 5 Setup Receive
- 6 Setup Send
- How to Fax
- Basic sending operations
- Advanced sending operations
- 7 Auto Dial numbers and dialling options
- 8 Remote Fax Options
- 9 Printing reports
- 10 Making copies
- 11 Using the MFC as a printer
- 12 Printer driver settings
- 13 How to scan using Windows®
- Scanning a document
- Scanning a document (For Windows® XP only)
- Using the scan key (For USB or Parallel interface cable users)
- Using ScanSoft® PaperPort® and OmniPage® OCR
- 14 Using the Brother Control Center
- 15 Using the Windows®-Based Brother SmartUI Control Center
- Brother SmartUI Control Center
- Brother Control Center features
- Hardware Section: Changing the Scan to button configuration
- Software Section
- Scan to File
- Scan to E-mail
- Scan to OCR (Word Processing program)
- Scan to Graphics application (example: Microsoft Paint)
- Fax setting (PC-Fax using the Brother Fax Driver)
- Custom: User-defined buttons
- 16 Using MFC Remote Setup
- 17 Using Brother PC-FAX software
- PC-FAX sending
- Speed-Dial setup
- The Address Book
- Setting up a Member in the Address Book
- Setting up a Group for Broadcasting
- Editing Member information
- Deleting a Member or Group
- Exporting the Address Book
- Importing to the Address Book
- Setting up a Cover Page
- You can enter information in each field
- Sending a file as a PC-FAX using the Facsimile style
- Sending a file as a PC-FAX using the Simple style
- Setting up PC-FAX receiving (Windows® 98/98SE/Me/2000 Professional and Windows NT® WS 4.0 only)
- Receiving a fax into the PC (Windows® XP only)
- 18 Using your MFC with a Macintosh®
- Setting up your USB-equipped Apple® Macintosh®
- Using the Brother printer driver with your Apple® Macintosh® (Mac OS® 8.6 - 9.2)
- Using the Brother Printer Driver with Your Apple® Macintosh® (Mac OS® X)
- Using the PS driver with your Apple® Macintosh®
- Sending a fax from your Macintosh® application
- Using the Brother TWAIN scanner driver with your Macintosh®
- Using Presto!® PageManager®
- MFC Remote Setup (Mac OS® X)
- 19 Network Scanning
- 20 Brother Network PC-FAX software
- 21 Important information
- 22 Troubleshooting and routine maintenance
- 23 Optional accessories
- Glossary
- Specifications
- Index
- Remote Retrieval Access card
- brother UK/IRE/SAF/PAN NORDIC

SETUP RECEIVE 5 - 6
Reception into memory
As soon as the paper tray becomes empty during fax reception, the
screen will display
Check Paper
; please put some paper in the
paper tray. (See Quick Setup Guide.)
If the Memory Receive switch is ON at this time…
The current fax reception will continue, with the remaining pages
being stored in memory, if it is available. Subsequent incoming faxes
will also be stored into memory until the memory is full, following with
no further incoming fax calls will be automatically answered. To print
all data, put paper in the paper tray.
If the Memory Receive switch is OFF at this time…
The current fax reception will continue, with the remaining page(s)
being stored in memory, subject to available memory. Subsequent
incoming fax calls will not be automatically answered until fresh
paper is put in the paper tray. To print the last fax received, load
paper in the paper tray.
1
If it is not illuminated in green, press (
Fax
).
2
Press
Menu
,
2
,
1
,
6
.
3
Use or to select
On
(or
Off
).
Press
Set
.
4
Press
Stop/Exit
.
21.Setup Receive
6.Memory Receive
▲
On
▼
Off
Select
▲▼
& Set