
User Manual
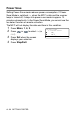
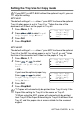
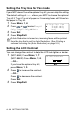

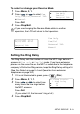

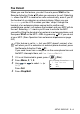
Table Of Contents
- USER'S GUIDE MFC-8440 MFC-8840D
- APPROVAL INFORMATION
- Compilation and Publication Notice
- "EC"Declararion of Conformity
- Safety precautions
- Choosing a location
- Quick Reference Guide
- Table of Contents
- 1 Introduction
- 2 Paper
- 3 On-screen programming
- 4 Getting started
- Initial Setup
- General Setup
- Setting the Mode Timer
- Setting the Paper Type
- Setting the Paper Size
- Setting the Ring Volume
- Setting the Beeper Volume
- Setting the Speaker Volume
- Turning on Automatic Daylight Savings Time
- Toner Save
- Sleep Time
- Turning off the Scanner Lamp
- Power Save
- Setting the Tray Use for Copy mode
- Setting the Tray Use for Fax mode
- Setting the LCD Contrast
- Initial Setup depending on Your Country
- 5 Setup Receive
- 6 Setup Send
- How to Fax
- Basic sending operations
- Advanced sending operations
- 7 Auto Dial numbers and dialling options
- 8 Remote Fax Options
- 9 Printing reports
- 10 Making copies
- 11 Using the MFC as a printer
- 12 Printer driver settings
- 13 How to scan using Windows®
- Scanning a document
- Scanning a document (For Windows® XP only)
- Using the scan key (For USB or Parallel interface cable users)
- Using ScanSoft® PaperPort® and OmniPage® OCR
- 14 Using the Brother Control Center
- 15 Using the Windows®-Based Brother SmartUI Control Center
- Brother SmartUI Control Center
- Brother Control Center features
- Hardware Section: Changing the Scan to button configuration
- Software Section
- Scan to File
- Scan to E-mail
- Scan to OCR (Word Processing program)
- Scan to Graphics application (example: Microsoft Paint)
- Fax setting (PC-Fax using the Brother Fax Driver)
- Custom: User-defined buttons
- 16 Using MFC Remote Setup
- 17 Using Brother PC-FAX software
- PC-FAX sending
- Speed-Dial setup
- The Address Book
- Setting up a Member in the Address Book
- Setting up a Group for Broadcasting
- Editing Member information
- Deleting a Member or Group
- Exporting the Address Book
- Importing to the Address Book
- Setting up a Cover Page
- You can enter information in each field
- Sending a file as a PC-FAX using the Facsimile style
- Sending a file as a PC-FAX using the Simple style
- Setting up PC-FAX receiving (Windows® 98/98SE/Me/2000 Professional and Windows NT® WS 4.0 only)
- Receiving a fax into the PC (Windows® XP only)
- 18 Using your MFC with a Macintosh®
- Setting up your USB-equipped Apple® Macintosh®
- Using the Brother printer driver with your Apple® Macintosh® (Mac OS® 8.6 - 9.2)
- Using the Brother Printer Driver with Your Apple® Macintosh® (Mac OS® X)
- Using the PS driver with your Apple® Macintosh®
- Sending a fax from your Macintosh® application
- Using the Brother TWAIN scanner driver with your Macintosh®
- Using Presto!® PageManager®
- MFC Remote Setup (Mac OS® X)
- 19 Network Scanning
- 20 Brother Network PC-FAX software
- 21 Important information
- 22 Troubleshooting and routine maintenance
- 23 Optional accessories
- Glossary
- Specifications
- Index
- Remote Retrieval Access card
- brother UK/IRE/SAF/PAN NORDIC

4 - 14 GETTING STARTED
Setting the Tray Use for Fax mode
If your MFC doesn’t have the optional tray #2, you can skip this setting.
The default setting of
Auto
allows your MFC to choose the optional
Tray #2 if Tray #1 is out of paper or if incoming faxes will fit best on
the paper in Tray #2.
1
Press
Menu
,
1
,
8
.
2
Press or to select
Tray#1
Only
,
Tray#2 Only
, or
Auto
.
3
Press
Set
.
4
Press
Stop/Exit
.
Setting the LCD Contrast
You can change the contrast to help the LCD look lighter or darker.
1
(MFC-8440) Press
Menu
,
1
,
7
.
(MFC-8840D) Press
Menu
,
1
,
8
.
—OR—
If you have the optional tray #2,
press
Menu
,
1
,
9
.
2
Press
to increase the contrast.
—OR—
Press
to decrease the contrast.
Press
Set
.
3
Press
Stop/Exit
.
If Auto Reduction is turned on, incoming faxes will be printed
from the tray that is set for Auto Reduction. (See Printing a
reduced incoming fax (Auto Reduction) on page 5-5.)
18.Tray Use: Fax
▲
Tray#1 Only
Tray#2 Only
▼
Auto
Select
▲▼
& Set
19.LCD Contrast
-+
Select & Set