
User Manual

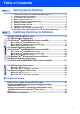
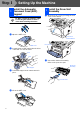
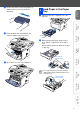
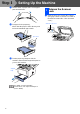
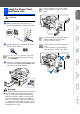
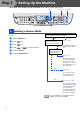
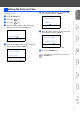
Table Of Contents
- Quick Setup Guide MFC-8440/MFC-8840D/MFC-8840DN
- Getting Started
- Table of Contents
- Step1 Setting Up the Machine
- 1 Install the Automatic Document Feed (ADF) Support
- 2 Install the Drum Unit Assembly
- 3 Load Paper in the Paper Tray
- 4 Release the Scanner Lock
- 5 Install the Power Cord and Phone Line
- 6 Selecting a Receive Mode
- 7 Setting the Date and Time
- 8 Setting Your Station ID
- 9 Selecting Your Language (Canada Only)
- 10 Sending in the Product Registration and Test Sheet (USA Only)
- Step2 Installing the Driver & Software
- Supplied CD-ROM “MFL-Pro Suite”
- For USB Interface Cable Users (For Windows® 98/98SE/Me/2000 Professional/XP)
- For Parallel Interface Cable Users (For Windows® 98/98SE/Me/2000 Professional/XP)
- For Windows NT® Workstation Version 4.0 Users
- For Network Interface Cable Users (For Windows® 98/98SE/Me/NT/2000 Professional/XP)
- For USB Interface Cable Users
- For Network Interface Cable Users
- For Administrators
- brother USA

6
Setting Up the Machine
3
Fan the stack of paper well to avoid paper
jams and misfeeds.
4
Put paper in the paper tray.
Check that the paper is flat in the tray and
below the maximum paper mark.
5
Put the paper tray firmly back in the
machine and unfold the support flap before
you use the machine.
1
Push the lever up to unlock the scanner.
(The gray scanner lock lever is located at
the back left under side of the document
cover.)
For details on supported paper
specifications, see “Paper” in Chapter 2
(User’s Guide).
Up to here.
Support
Flap
4
Release the Scanner
Lock
Scanner Lock Lever
Step 1