
User Manual

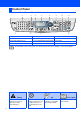
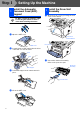
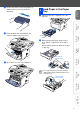
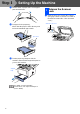
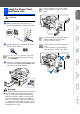
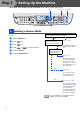
Table Of Contents
- Quick Setup Guide MFC-8440/MFC-8840D/MFC-8840DN
- Getting Started
- Table of Contents
- Step1 Setting Up the Machine
- 1 Install the Automatic Document Feed (ADF) Support
- 2 Install the Drum Unit Assembly
- 3 Load Paper in the Paper Tray
- 4 Release the Scanner Lock
- 5 Install the Power Cord and Phone Line
- 6 Selecting a Receive Mode
- 7 Setting the Date and Time
- 8 Setting Your Station ID
- 9 Selecting Your Language (Canada Only)
- 10 Sending in the Product Registration and Test Sheet (USA Only)
- Step2 Installing the Driver & Software
- Supplied CD-ROM “MFL-Pro Suite”
- For USB Interface Cable Users (For Windows® 98/98SE/Me/2000 Professional/XP)
- For Parallel Interface Cable Users (For Windows® 98/98SE/Me/2000 Professional/XP)
- For Windows NT® Workstation Version 4.0 Users
- For Network Interface Cable Users (For Windows® 98/98SE/Me/NT/2000 Professional/XP)
- For USB Interface Cable Users
- For Network Interface Cable Users
- For Administrators
- brother USA

5
Setting Up
the Machine
Windows
®
USB
Windows
®
Parallel
Windows
NT
®
4.0
Parallel
Macintosh
®
USB
Macintosh
®
Network
Windows
®
Network
For
Administrators
3
Rock it from side to side several times to
distribute the toner evenly inside the
assembly.
4
Push the drum unit assembly into the
machine (until it snaps into place).
5
Close the front cover of the machine.
1
Pull the paper tray completely out of the
machine.
2
While pressing the paper guide release
lever, slide the adjusters to fit the paper
size.
Check that the guides are firmly in the slots
on the tray.
3
Load Paper in the Paper
Tray
For Legal size paper, press the universal
guide release button and pull out the rear of
the paper tray.
Paper Guide
Release Lever
Universal Guide
Release Button