
User Manual
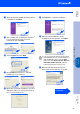
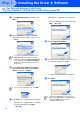
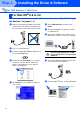


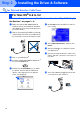


Table Of Contents
- Quick Setup Guide MFC-8440 MFC-8840D
- Getting Started
- Table of Contents
- Step1 Setting Up the Machine
- Step2 Installing the Driver & Software
- Supplied CD-ROM (MFL-Pro Suite)
- For USB Interface Cable Users (For Windows® 98/98SE/Me/2000 Professional/XP)
- For Parallel Interface Cable Users (For Windows® 98/98SE/Me/2000 Professional/XP)
- For Windows NT® Workstation Version 4.0 Users
- For Network Interface Cable Users (For Windows® 98/98SE/Me/NT/2000 Professional/XP)
- For USB Interface Cable Users
- For Network Interface Cable Users
- For Administrators
- brother UK

43
Installing the Driver & Software
Make sure that you have completed the instructions from Step 1 “Setting Up
the Machine” on pages 2 - 8.
1
Switch off and unplug the MFC from the AC
outlet and disconnect it from your Macintosh
if you already connected an interface cable.
2
Turn on your Macintosh
®
.
3
Insert the supplied CD-ROM for Macintosh
®
into your CD-ROM drive.
4
Double-click the Start Here OSX icon to
install the printer driver, Scanner driver,
Brother PC-FAX Send and Remote Setup
program. If the language screen appears
select your language.
(Scanning is not supported in Mac OS
®
10.1).
5
Click Install next to the MFL-Pro Suite.
6
Select USB Interface, and then click
Install.
7
Connect the USB interface cable to your
Macintosh
®
, and then connect it to the MFC.
Do not connect the MFC to a USB
port on a keyboard or a non powered
USB hub.
8
Turn on the MFC by pluging in the power
cord. Turn the power switch on.
9
Select Applications from the Go menu.
0
Open the Utilities folder.
For USB Interface Cable Users
For Mac OS
®
X 10.1/10.2.1 or greater
Step 2