
User Manual
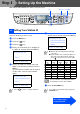
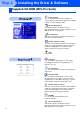
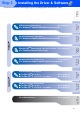
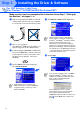
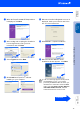
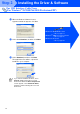

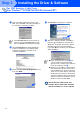
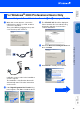
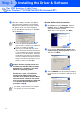
Table Of Contents
- Quick Setup Guide MFC-8440 MFC-8840D
- Getting Started
- Table of Contents
- Step1 Setting Up the Machine
- Step2 Installing the Driver & Software
- Supplied CD-ROM (MFL-Pro Suite)
- For USB Interface Cable Users (For Windows® 98/98SE/Me/2000 Professional/XP)
- For Parallel Interface Cable Users (For Windows® 98/98SE/Me/2000 Professional/XP)
- For Windows NT® Workstation Version 4.0 Users
- For Network Interface Cable Users (For Windows® 98/98SE/Me/NT/2000 Professional/XP)
- For USB Interface Cable Users
- For Network Interface Cable Users
- For Administrators
- brother UK

14
Make sure that you followed the instructions in
1
to
F
on pages 11 - 13.
G
When this screen appears, connect the
USB interface cable to your PC, and then
connect it to the MFC.
Turn on the MFC by plugging in the power
cord. Turn the power switch on.
It will take a few seconds for the installation
screen to appear.
The installation of the Brother drivers will
automatically start. Follow the instructions
on the screen.
H
Select BRUSB: USB Printer Port, and then
click Next.
I
Accept the default Printer name by selecting
Yes, and then click Next.
J
Select Yes (recommended), and then click
Finish. A test page will be printed so you
can check the print quality.
For Windows
®
98/98SE/Me Users Only
Continued ...
Step 2
Installing the Driver & Software
Setting Up
the Machine
Windows
®
USB
For
Administrators