
Quick Setup Guide
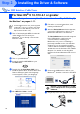
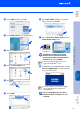
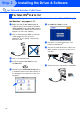
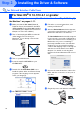
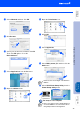
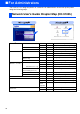

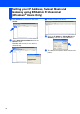
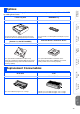
Table Of Contents
- Quick Setup Guide MFC-8440/MFC-8840D/MFC-8840DN
- Getting Started
- Table of Contents
- Step1 Setting Up the Machine
- 1 Install the Automatic Document Feed (ADF) Support
- 2 Install the Drum Unit Assembly
- 3 Load Paper in the Paper Tray
- 4 Release the Scanner Lock
- 5 Install the Power Cord and Phone Line
- 6 Selecting a Receive Mode
- 7 Setting the Date and Time
- 8 Setting Your Station ID
- 9 Selecting Your Language (Canada Only)
- 10 Sending in the Product Registration and Test Sheet (USA Only)
- Step2 Installing the Driver & Software
- Supplied CD-ROM “MFL-Pro Suite”
- For USB Interface Cable Users (For Windows® 98/98SE/Me/2000 Professional/XP)
- For Parallel Interface Cable Users (For Windows® 98/98SE/Me/2000 Professional/XP)
- For Windows NT® Workstation Version 4.0 Users
- For Network Interface Cable Users (For Windows® 98/98SE/Me/NT/2000 Professional/XP)
- For USB Interface Cable Users
- For Network Interface Cable Users
- For Administrators
- brother USA

45
A
Select Network and then click OK.
B
Click Browse.
C
Select your model name, and then click OK.
Then click OK again to close the
DeviceSelector.
D
Select Applications from the Go menu.
E
Open the Utilities folder.
F
Open the Print Center icon.
G
Click Add.
H
Select AppleTalk.
I
Select BRN_xxxxxx_P1 and then click the
Add button.
J
Select Quit Printer Setup Utility from the
Printer Setup Utility menu.
The setup is now complete.
xxxxxx are the last six digits of the Ethernet
address.
Please see Network User’s Guide Chapter 7
on the CD-ROM for more information about
using Simple Network Configuration.
Installing the Driver & Software
Setting Up
the Machine
For
Administrators
Macintosh
®
Network