
User Manual
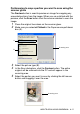

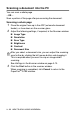
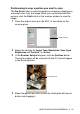
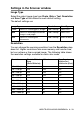
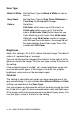
Table Of Contents
- SOFTWARE USER’S GUIDE
- Table of contents
- 1 Using the machine as a printer
- 2 Printer driver settings (Windows® Only)
- 3 How to scan using Windows®
- Scanning a document (For Windows® XP only)
- Scanning a document
- Using the scan key (For USB or Parallel interface cable users)
- Using ScanSoft® PaperPort® 9.0SE and OmniPage® OCR
- 4 Using ControlCenter2.0 (For Windows®)
- 5 Using MFC Remote Setup (For Windows®) (For MFC-8440, MFC-8840D and MFC-8840DN only)
- 6 Using Brother PC-FAX software (For Windows®) (For MFC-8440, MFC-8840D and MFC-8840DN only)
- PC-FAX sending
- Speed-Dial setup
- Brother Address Book
- Setting up a Member in the Address Book
- Setting up a Group for Broadcasting
- Editing Member information
- Deleting a Member or Group
- Exporting the Address Book
- Importing to the Address Book
- Setting up a Cover Page
- Entering Cover Page Information
- Sending a file as a PC-FAX using the Facsimile style user interface
- Sending a file as a PC-FAX using the Simple style user interface
- Setting up PC-FAX receiving
- 7 Using your machine with a Macintosh®
- Setting up your USB-equipped Apple® Macintosh®
- Using the Brother printer driver with your Apple® Macintosh® (Mac OS® 8.6 - 9.2)
- Using the Brother Printer Driver with Your Apple® Macintosh® (Mac OS® X)
- Using the PS driver with your Apple® Macintosh®
- Sending a fax from your Macintosh® application (For MFC-8440, MFC-8840D and MFC-8840DN only)
- Using the Brother TWAIN scanner driver with your Macintosh®
- Using Presto!® PageManager®
- Using ControlCenter2.0 (For Mac OS® X 10.2.1 or greater)
- MFC Remote Setup (Mac OS® X) (For MFC-8440, MFC-8840D and MFC-8840DN only)
- 8 Network Scanning (Windows® 98/98SE/Me/2000 Professional and XP only)
- 9 Brother Network PC-FAX software (For MFC-8440, MFC-8840D and MFC-8840DN only)
- Index
- brother USA/CANADA
3 - 14 HOW TO SCAN USING WINDOWS
®
Scan Type
Brightness
Adjust this settings (-50 to 50) to obtain the best image. The default
value is 0, representing an ‘average’.
You can set the level by dragging the slide bar to the right or left to
lighten or darken the image. You can also type a value in the box for
the setting.
If the scanned image is too light, set a lower brightness value and
scan the document again. If the image is too dark, set a higher
brightness value and scan the document again.
Contrast
This setting is adjustable only when you have selected one of the
gray scale settings. It is not available when Black & White and Color
settings are selected as the Scan Type.
You can increase or decrease the contrast level by moving the slide
bar to the left or right. An increase emphasizes dark and light areas
of the image, while a decrease reveals more detail in gray areas. You
can also type a value in the box for the setting.
Black & White: Set the Scan Type to Black & White for text or
line art.
Gray Scale: Set the Scan Type to Gray (Error Diffusion) or
True Gray for photographic images.
Colors: Set either:
256 Color, which scans up to 256 colors, or
24-bit color which scans up to 16.8 million
colors, 24-bit color (Fast) which does not use
Color Matching and is faster than 24-bit color.
Although using 24-bit color creates an image
with the most accurate colors, the image file will
be approximately three times larger than a file
created with 256 Color.