
User Manual

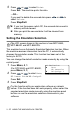


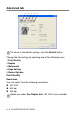
Table Of Contents
- SOFTWARE USER’S GUIDE
- Table of contents
- 1 Using the machine as a printer
- 2 Printer driver settings (Windows® Only)
- 3 How to scan using Windows®
- Scanning a document (For Windows® XP only)
- Scanning a document
- Using the scan key (For USB or Parallel interface cable users)
- Using ScanSoft® PaperPort® 9.0SE and OmniPage® OCR
- 4 Using ControlCenter2.0 (For Windows®)
- 5 Using MFC Remote Setup (For Windows®) (For MFC-8440, MFC-8840D and MFC-8840DN only)
- 6 Using Brother PC-FAX software (For Windows®) (For MFC-8440, MFC-8840D and MFC-8840DN only)
- PC-FAX sending
- Speed-Dial setup
- Brother Address Book
- Setting up a Member in the Address Book
- Setting up a Group for Broadcasting
- Editing Member information
- Deleting a Member or Group
- Exporting the Address Book
- Importing to the Address Book
- Setting up a Cover Page
- Entering Cover Page Information
- Sending a file as a PC-FAX using the Facsimile style user interface
- Sending a file as a PC-FAX using the Simple style user interface
- Setting up PC-FAX receiving
- 7 Using your machine with a Macintosh®
- Setting up your USB-equipped Apple® Macintosh®
- Using the Brother printer driver with your Apple® Macintosh® (Mac OS® 8.6 - 9.2)
- Using the Brother Printer Driver with Your Apple® Macintosh® (Mac OS® X)
- Using the PS driver with your Apple® Macintosh®
- Sending a fax from your Macintosh® application (For MFC-8440, MFC-8840D and MFC-8840DN only)
- Using the Brother TWAIN scanner driver with your Macintosh®
- Using Presto!® PageManager®
- Using ControlCenter2.0 (For Mac OS® X 10.2.1 or greater)
- MFC Remote Setup (Mac OS® X) (For MFC-8440, MFC-8840D and MFC-8840DN only)
- 8 Network Scanning (Windows® 98/98SE/Me/2000 Professional and XP only)
- 9 Brother Network PC-FAX software (For MFC-8440, MFC-8840D and MFC-8840DN only)
- Index
- brother USA/CANADA

1 - 17 USING THE MACHINE AS A PRINTER
5
Press or to select
Print
.
Press
Set
. The machine prints the data.
—OR—
If you want to delete the secured data press or to
select
Delete
.
Press
Stop/Exit
.
Setting the Emulation Selection
This machine has an Automatic Emulation Selection function. When
the machine receives information from the PC, it automatically
chooses the emulation mode. This function has been set at the
factory to AUTO.
You can change the default emulation mode manually by using the
control panel.
1
Press
Menu
,
4
,
1
.
(For DCP-8040 and DCP-8045D,
press
Menu
,
3
,
1
)
2
Press or to select
Auto
,
HP Laser Jet
or
BR-Script3
.
Press
Set
.
3
Press
Stop/Exit
.
■
If you turn the power switch Off, the secured data saved in
memory will be cleared.
■
After you print the secured data it will be cleared from
memory.
The LCD screen shown in this section is from MFC-8440,
MFC-8840D and MFC-8840DN.
Try this function with your application software or network
server. If the function does not work properly, either select the
required emulation mode manually using the machine panel
buttons or use the emulation selection commands in your
software.
41.Emulation
▲
Auto
HP LaserJet
▼
BS-Script 3
Select
▲▼
& Set