
User Guide


Table Of Contents
- USER’S GUIDE MFC-8480DN/MFC-8680DN/MFC-8690DW/MFC-8890DW
- Brother numbers
- Ordering accessories and supplies
- Notice - Disclaimer of Warranties (USA and Canada)
- Compilation and Publication Notice
- Brother™ One-Year Limited Warranty and Replacement Service (USA Only)
- BROTHER MULTIFUNCTION CENTER / FAX MACHINELIMITED WARRANTY (Canada only)
- Table of Contents
- Section I: General
- 1 General information
- Using the documentation
- Accessing the Software User’s Guide and Network User’s Guide
- Viewing documentation
- Viewing documentation (Windows®)
- How to find scanning instructions
- Software User’s Guide:
- ScanSoft™ PaperPort™ 11SE with OCR How-to-Guides:
- How to find Network setup instructions (MFC-8690DW and MFC-8890DW)
- Viewing documentation (Macintosh)
- How to find scanning instructions
- Software User’s Guide:
- Presto! PageManager User’s Guide:
- How to find Network setup instructions (MFC-8690DW and MFC-8890DW)
- Viewing documentation
- Accessing Brother support (Windows®)
- Control panel overview
- 2 Loading paper and documents
- 3 General Setup
- 4 Security features
- 1 General information
- Section II: Fax
- 5 Sending a fax
- How to fax
- Broadcasting
- Additional sending operations
- 6 Receiving a fax
- 7 Telephone services and external devices
- 8 Dialing and storing numbers
- 9 Remote Fax Options
- 10 Polling
- 11 Printing reports
- 5 Sending a fax
- Section III: Copy
- Section IV:Direct printing
- Section V:Software
- Section VI: Appendixes
- A Safety and legal
- B Options
- C Troubleshooting and routine maintenance
- D Menu and features
- E Specifications
- F Glossary
- Index
- brother USA/CAN
Troubleshooting and routine maintenance
169
C
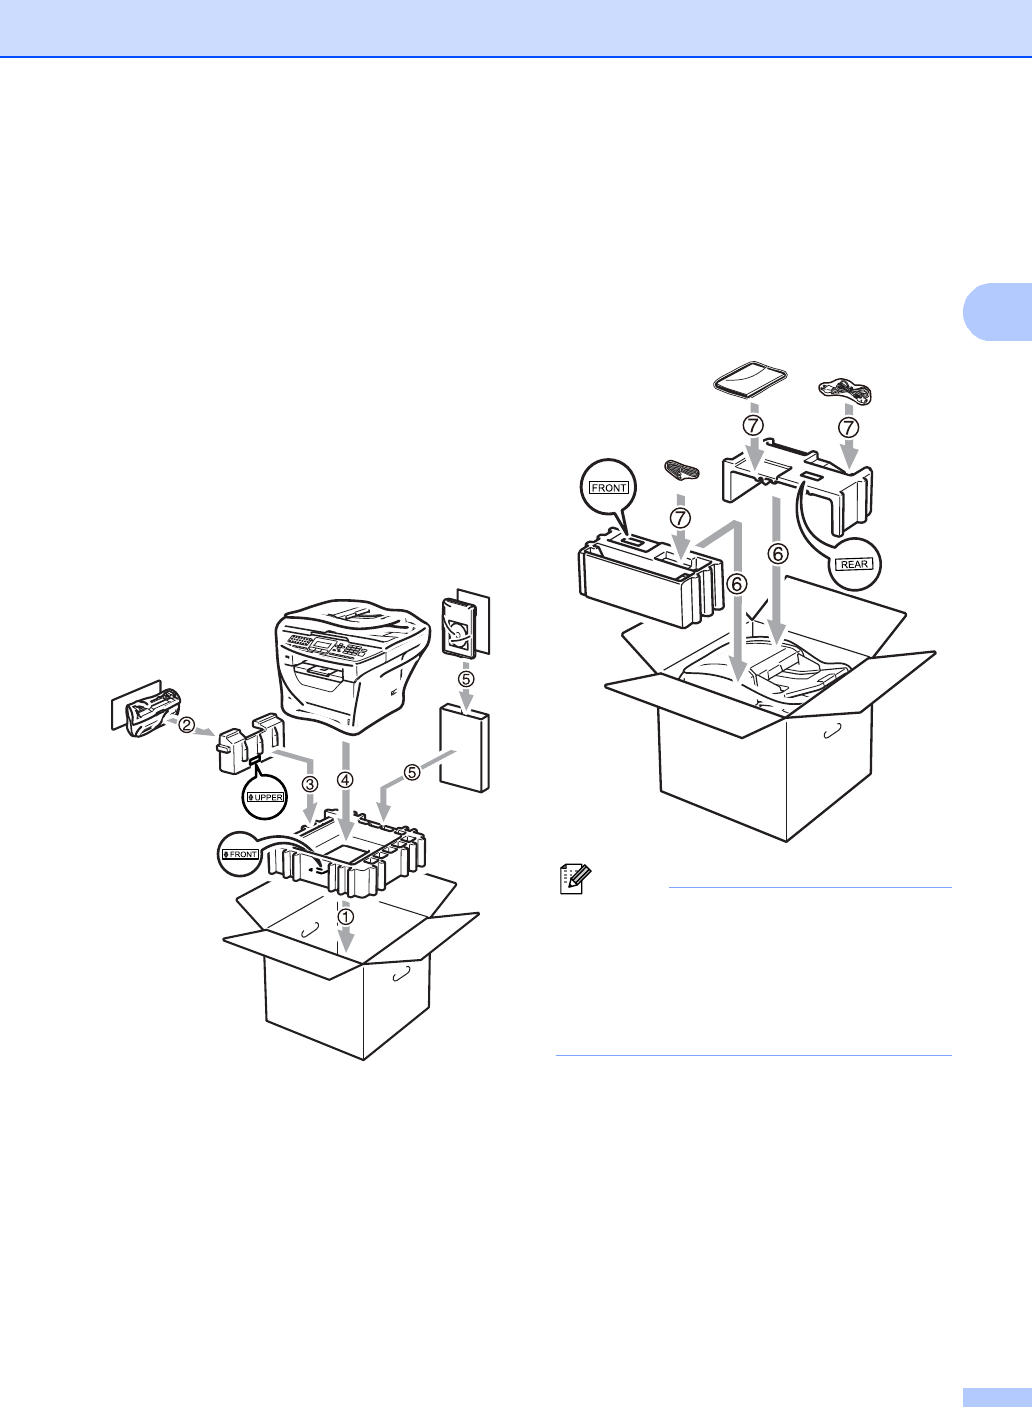
f Take out the drum unit and toner
cartridge assembly. Leave the toner
cartridge installed in the drum unit.
g Put the drum unit and toner cartridge
assembly into a plastic bag and seal the
bag.
h Close the front cover.
i Put the styrofoam piece marked
“FRONT” into the original carton (1).
Pack the drum unit and toner cartridge
assembly (2) and put it in as shown
below (3). Wrap the machine in the
plastic bag and put it in the original
carton (4). Put the printed material
behind the machine (5).
j Put the two styrofoam pieces into the
carton matching the front of the machine
to the “FRONT” mark on one of the
styrofoam pieces, and the back of the
machine to the “REAR” mark on the
other styrofoam pieces (6). Put the AC
power cord and printed materials in the
original carton as shown below (7).
Note
If you are returning your machine to
Brother as part of the Exchange Service,
pack only the machine. Keep all separate
parts, including the drum unit and toner
cartridge assembly, and printed materials
to use with your ‘Exchange’ machine.
k Close the carton and tape it shut.