
- MFC-822 Multi-Protocol Print/Fax Server Network User's Guide
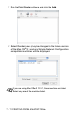
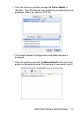

Table Of Contents
- Network User’s Guide
- Introduction
- IMPORTANT INFORMATION: REGULATIONS
- Table of Contents
- 1 Unix Printing 1-1
- 2 TCP/IP Printing 2-1
- 3 Peer to Peer Printing 3-1
- 4 NetBIOS Peer to Peer Printing 4-1
- 5 Configuring Internet Printing for Windows® 5-1
- 6 Novell NetWare Printing 6-1
- 7 Printing from a Macintosh® 7-1
- 8 DLC Printing 8-1
- 9 Web Based Management 9-1
- 10 Front Panel Setup Menu 10-1
- 11 TCP/IP Configuration 11-1
- 12 Internet FAX 12-1
- 13 Troubleshooting 13-1
- 14 Brother Internet Fax Printing Software 14-1
- 15 Appendix A-1
- 16 INDEX I-1
- 1.Unix Printing
- 2.TCP/IP Printing
- Printing from Windows NT®4.0, Windows® 2000/XP, LAN Server and Warp Server
- Overview
- Windows NT®4.0 and Windows® 2000/XP (TCP/IP) Configuration
- Windows® 2000/XP Printing (Printer Driver not yet installed)
- Windows® 2000/XP Printing (Printer Driver already installed)
- Windows NT®4.0 Printing
- Windows NT®4.0 Printing Installing the Brother Peer to Peer Software
- Windows NT®4.0 Printing Associating to the Printer
- Windows NT®4.0 Printing Adding a Second Brother LPR Port
- Other Sources of Information
- Printing from Windows NT®4.0, Windows® 2000/XP, LAN Server and Warp Server
- 3.Peer to Peer Printing
- 4.NetBIOS Peer to Peer Printing
- How to Print Using NetBIOS in Windows® 95/98/Me/2000/XP, Windows NT®4.0, LAN Server and OS/2 Warp Server
- 5.Configuring Internet Printing for Windows®
- Internet Printing Installation
- Overview
- Brother Internet Print General Information
- Brother Internet Print: Configuring the Brother Print/Fax Server
- Brother Internet Print: Using BRAdmin Professional utility to Configure the Print Server
- Brother Internet Print: Using a Web Browser to Configure the Print Server
- Brother Internet Print: Installing the BIP software on Windows® 95/98/Me/2000/XP and Windows NT®4.0
- Adding a Second Brother Internet Port
- Windows® 2000/XP IPP Printing
- Specifying a Different URL
- Other Sources of Information
- Internet Printing Installation
- 6.Novell NetWare Printing
- How to Configure Novell NetWare Printing
- Overview
- General Information
- Creating a NDPS Printer Using NWADMIN for NetWare5
- NDPS Manager
- NDPS Broker
- Creating a Printer Agent
- Configuring NetWare 3 and NetWare 4 systems
- Creating a Network Print Server (Bindery Queue Server) using BRAdmin Professional utility
- Creating a Network Print Server (NDS Queue Server) using BRAdmin Professional utility
- Creating a Network Print Server (NDS Queue Server) using Novell NWADMIN and BRAdmin Professional utility
- Creating a Network Print Server (NDS Remote Printer) using Novell NWAdmin and BRAdmin Professional utility
- Other Sources of Information
- How to Configure Novell NetWare Printing
- 7.Printing from a Macintosh®
- Printing From a Macintosh® Using AppleTalk and TCP/IP or Rendezvous
- Overview
- Macintosh® Configuration (Mac OS® 8.6 - 9.2)
- How to Select the Print Server (AppleTalk/EtherTalk)
- How to Select the Print Server (TCP/IP)
- Macintosh Configuration (Mac OS® X 10.1-10.2.1/10.3 or greater)
- How to Select the Print Server (AppleTalk/EtherTalk)
- How to Select the Print Server (TCP/IP)
- Changing the Configuration
- Other Sources of Information
- Apple Rendezvous™ Printing
- Printing From a Macintosh® Using AppleTalk and TCP/IP or Rendezvous
- 8.DLC Printing
- 9.Web Based Management
- 10.Front Panel Setup Menu
- 11.TCP/IP Configuration
- Assigning TCP/IP Information
- Overview
- Using the machine control panel to allocate an IP address (Models with LCD panels only)
- Changing the IP Address using the BRAdmin Professional utility
- Using BRAdmin Professional utility and the IPX/ SPX Protocol to set the IP address
- Using BRAdmin Professional utility and the TCP/ IP Protocol to set the IP address
- Using DHCP to Configure the IP address
- Using APIPA to Configure the IP Address
- Using ARP to Configure the Print/Fax Server IP Address
- Using RARP to Configure the IP Address
- Using BOOTP to Configure the IP Address
- Assigning TCP/IP Information
- 12.Internet FAX
- 13.Troubleshooting
- Overview
- Installation problems
- Resetting the Print/Fax Sever back to factory settings (Test Switch)
- Intermittent Problems
- TCP/IP Troubleshooting
- UNIX Troubleshooting
- Windows NT®4.0/LAN Server (TCP/IP) Troubleshooting
- Windows® 95/98/Me Peer to Peer Print (LPR) Troubleshooting
- Windows® 95/98/Me Peer-to-Peer (HP JetAdmin compatible method) Troubleshooting
- Windows® 95/98/Me/2000/XP and Windows NT®4.0 Peer-to-Peer Print (NetBIOS) Troubleshooting
- Brother Internet Print (TCP/IP) Troubleshooting
- Windows® 95/98/Me/2000/XP IPP Troubleshooting
- Novell NetWare Troubleshooting
- AppleTalk Troubleshooting
- DLC/LLC Troubleshooting
- Web Browser Troubleshooting (TCP/IP)
- Internet Fax Troubleshooting
- 14.Brother Internet Fax Printing Software
- Appendix
- INDEX

8 - 3 DLC PRINTING
NC9100h_FM6.0
9
The selected print server address will then appear in the smaller
box under Card Address.
10
Type in any desired name for the port (the name must not be the
name of an existing port or DOS device, such as LPT1) and click
OK then on the Printer Ports screen, click Next.
11
Select the correct driver click Next.
12
Give a name to the printer and specify if you wish to be able to
print from DOS application. Then click Next.
13
Specify the share name (if you are going to share the printer).
14
Enter the Location and Comment information and click Next
until you see the Completing the Add Printer Wizard screen.
15
Click Finish.
Windows NT
®
4.0 Printer Setup
Log into Windows NT
®
4.0 with administrative privileges. From the
Start menu, select Settings and then Printers.
1
Select
Add Printer
(If you have already installed a Brother printer
driver, double click the printer driver that you wish to configure and
then select
Printers/Properties
, select the
Ports
tab and
continue from Step 4 (ignoring steps 9-11 about installing the
correct driver)).
2
Select My Computer and then click Next.
3
Select Add a Port.
4
Select
Hewlett-Packard Network Port
and then click
New Port
.