
- MFC-822 Multi-Protocol Print/Fax Server Network User's Guide

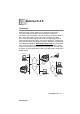


Table Of Contents
- Network User’s Guide
- Introduction
- IMPORTANT INFORMATION: REGULATIONS
- Table of Contents
- 1 Unix Printing 1-1
- 2 TCP/IP Printing 2-1
- 3 Peer to Peer Printing 3-1
- 4 NetBIOS Peer to Peer Printing 4-1
- 5 Configuring Internet Printing for Windows® 5-1
- 6 Novell NetWare Printing 6-1
- 7 Printing from a Macintosh® 7-1
- 8 DLC Printing 8-1
- 9 Web Based Management 9-1
- 10 Front Panel Setup Menu 10-1
- 11 TCP/IP Configuration 11-1
- 12 Internet FAX 12-1
- 13 Troubleshooting 13-1
- 14 Brother Internet Fax Printing Software 14-1
- 15 Appendix A-1
- 16 INDEX I-1
- 1.Unix Printing
- 2.TCP/IP Printing
- Printing from Windows NT®4.0, Windows® 2000/XP, LAN Server and Warp Server
- Overview
- Windows NT®4.0 and Windows® 2000/XP (TCP/IP) Configuration
- Windows® 2000/XP Printing (Printer Driver not yet installed)
- Windows® 2000/XP Printing (Printer Driver already installed)
- Windows NT®4.0 Printing
- Windows NT®4.0 Printing Installing the Brother Peer to Peer Software
- Windows NT®4.0 Printing Associating to the Printer
- Windows NT®4.0 Printing Adding a Second Brother LPR Port
- Other Sources of Information
- Printing from Windows NT®4.0, Windows® 2000/XP, LAN Server and Warp Server
- 3.Peer to Peer Printing
- 4.NetBIOS Peer to Peer Printing
- How to Print Using NetBIOS in Windows® 95/98/Me/2000/XP, Windows NT®4.0, LAN Server and OS/2 Warp Server
- 5.Configuring Internet Printing for Windows®
- Internet Printing Installation
- Overview
- Brother Internet Print General Information
- Brother Internet Print: Configuring the Brother Print/Fax Server
- Brother Internet Print: Using BRAdmin Professional utility to Configure the Print Server
- Brother Internet Print: Using a Web Browser to Configure the Print Server
- Brother Internet Print: Installing the BIP software on Windows® 95/98/Me/2000/XP and Windows NT®4.0
- Adding a Second Brother Internet Port
- Windows® 2000/XP IPP Printing
- Specifying a Different URL
- Other Sources of Information
- Internet Printing Installation
- 6.Novell NetWare Printing
- How to Configure Novell NetWare Printing
- Overview
- General Information
- Creating a NDPS Printer Using NWADMIN for NetWare5
- NDPS Manager
- NDPS Broker
- Creating a Printer Agent
- Configuring NetWare 3 and NetWare 4 systems
- Creating a Network Print Server (Bindery Queue Server) using BRAdmin Professional utility
- Creating a Network Print Server (NDS Queue Server) using BRAdmin Professional utility
- Creating a Network Print Server (NDS Queue Server) using Novell NWADMIN and BRAdmin Professional utility
- Creating a Network Print Server (NDS Remote Printer) using Novell NWAdmin and BRAdmin Professional utility
- Other Sources of Information
- How to Configure Novell NetWare Printing
- 7.Printing from a Macintosh®
- Printing From a Macintosh® Using AppleTalk and TCP/IP or Rendezvous
- Overview
- Macintosh® Configuration (Mac OS® 8.6 - 9.2)
- How to Select the Print Server (AppleTalk/EtherTalk)
- How to Select the Print Server (TCP/IP)
- Macintosh Configuration (Mac OS® X 10.1-10.2.1/10.3 or greater)
- How to Select the Print Server (AppleTalk/EtherTalk)
- How to Select the Print Server (TCP/IP)
- Changing the Configuration
- Other Sources of Information
- Apple Rendezvous™ Printing
- Printing From a Macintosh® Using AppleTalk and TCP/IP or Rendezvous
- 8.DLC Printing
- 9.Web Based Management
- 10.Front Panel Setup Menu
- 11.TCP/IP Configuration
- Assigning TCP/IP Information
- Overview
- Using the machine control panel to allocate an IP address (Models with LCD panels only)
- Changing the IP Address using the BRAdmin Professional utility
- Using BRAdmin Professional utility and the IPX/ SPX Protocol to set the IP address
- Using BRAdmin Professional utility and the TCP/ IP Protocol to set the IP address
- Using DHCP to Configure the IP address
- Using APIPA to Configure the IP Address
- Using ARP to Configure the Print/Fax Server IP Address
- Using RARP to Configure the IP Address
- Using BOOTP to Configure the IP Address
- Assigning TCP/IP Information
- 12.Internet FAX
- 13.Troubleshooting
- Overview
- Installation problems
- Resetting the Print/Fax Sever back to factory settings (Test Switch)
- Intermittent Problems
- TCP/IP Troubleshooting
- UNIX Troubleshooting
- Windows NT®4.0/LAN Server (TCP/IP) Troubleshooting
- Windows® 95/98/Me Peer to Peer Print (LPR) Troubleshooting
- Windows® 95/98/Me Peer-to-Peer (HP JetAdmin compatible method) Troubleshooting
- Windows® 95/98/Me/2000/XP and Windows NT®4.0 Peer-to-Peer Print (NetBIOS) Troubleshooting
- Brother Internet Print (TCP/IP) Troubleshooting
- Windows® 95/98/Me/2000/XP IPP Troubleshooting
- Novell NetWare Troubleshooting
- AppleTalk Troubleshooting
- DLC/LLC Troubleshooting
- Web Browser Troubleshooting (TCP/IP)
- Internet Fax Troubleshooting
- 14.Brother Internet Fax Printing Software
- Appendix
- INDEX

12 - 2 INTERNET FAX
NC9100h_FM6.0
Getting Connected
Before sending or receiving an Internet Fax you must configure your
machine to communicate with your network and mail server. You
must ensure the following: a correctly configured IP address for your
machine, an E-mail address for your machine, the mail server(s) IP
address, mailbox name and password for your machine. If you are
unsure of any of these items, please contact your systems
administrator. For details of how to configure this information, refer
to the Web Based Management section (Internet Settings) of this
User’s Guide.
Front Panel Key Functions
Shift + 1
Used to change input mode. You can use Dial Pad keys as Standard
alphabet character keys.
Dial Pad
Used to enter Standard Alpha characters (28 letters), as well as @.
space ! “ # % & ’ () + / : ; < > = ? [ ] ^ - $ , * / and Numbers.
Shift + 3
To change between upper case and lower case for entering the e-
mail / I-Fax address.
or
Moves the LCD cursor to the left or right when you enter the texts.
Set
Used to store multiple numbers.
Start
Begins transmitting the document.
Stop/Exit
Deletes entered data and stops the scanning or transmitting process.
One-touch / Speed-Dial / Group Dial
These functions work the same way as with conventional machine’s.
However, please note that you cannot use chain dialling for E-mail
addresses.