
Printer/Fax/Scanner/Copier Quick Setup Guide
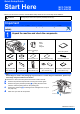
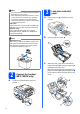
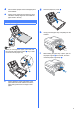

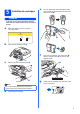

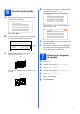
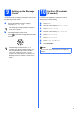
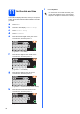
Table Of Contents
- Quick Setup Guide MFC-790CW MFC-990CW
- Start Here
- 1 Unpack the machine and check the components
- 2 Connect the handset (MFC-790CW only)
- 3 Load plain Letter/A4 paper
- 4 Connect the power cord and telephone line
- 5 Install the ink cartridges
- 6 Check the print quality
- 7 Choose your language (If needed)
- 8 Choose the correct Receive Mode
- 9 Setting up the Message Center
- 10 Set the LCD contrast (If needed)
- 11 Set the date and time
- 12 Set your station ID
- 13 Set tone or pulse dialing mode
- 14 Automatic Daylight Savings Time
- 15 Send in the Product Registration and Test Sheet (USA only)
- Set up the cordless handset (MFC-990CW only)
- For USB Interface Users (For Windows® 2000 Professional/XP/XP Professional x64 Edition/ Windows Vista®)
- For USB Interface Users (For Mac OS® X 10.2.4 or greater)
- For Wired Network Interface Users (For Windows® 2000 Professional/XP/XP Professional x64 Edition/ Windows Vista®)
- For Wired Network Interface Users (For Mac OS® X 10.2.4 or greater)
- For Wireless Network Interface Users
- 23 Before you begin
- 24 Confirm your network environment (Infrastructure Mode)
- Connecting the Brother machine to the wireless network
- Install the Drivers & Software (For Windows® 2000 Professional/XP/XP Professional x64 Edition/ Windows Vista®)
- Install the Drivers & Software (For Mac OS® X 10.2.4 or greater)
- Install Optional Applications Windows®
- For Network Users
- Consumables
- brother USA/CAN
- Start Here

4
4
Connect the power cord
and telephone line
a Connect the power cord.
b Connect the telephone line cord. Connect one
end of the telephone line cord to the jack on the
machine marked LINE and the other end to a
modular wall jack.
Important
DO NOT connect the USB cable yet (if you are
using a USB cable).
Important
The telephone line cord MUST be connected
to the jack on the machine marked LINE.
Note
If you are sharing one telephone line with an
external telephone, connect it as shown below.
Before you connect the external telephone,
remove the protective cap a from the EXT. jack
on the machine.
1 Extension telephone
2 External telephone
Note
If you are sharing one telephone line with an
external telephone answering machine, connect it
as shown below.
Before you connect the external telephone
answering machine, remove the protective cap a
from the EXT. jack on the machine.
Set the receive mode to
Manual
if you have
an external answering machine. See Choose
the correct Receive Mode on page 8. For
additional details, see Connecting an external
TAD (telephone answering device) in Chapter
7 of the User’s Guide.
11
22
1
1