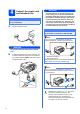
Quick Setup Guide Start Here MFC-790CW MFC-990CW Before you can use the machine, read this Quick Setup Guide for the correct setup and installation. WARNING Warnings tell you what to do to prevent possible personal injury. Important DO NOT connect the USB cable yet (if you are using a USB cable). 1 Unpack the machine and check the components 2 User’s Guide CD-ROM Black Yellow Cyan Magenta (Approx.
Note • The components included in the box may differ depending on your country. • Save all packing materials and the box in case for any reason you must ship your machine. • You need to purchase the correct interface cable for the interface you want to use (for USB or network connection). USB cable Please make sure you use a USB 2.0 cable (Type A/B) that is no more than 2 metres long.
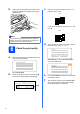
d e Fan the stack of paper well to avoid paper jams and misfeeds. Gently put the paper into the paper tray print side down and top edge first. Check that the paper is flat in the tray. Important Do not push the paper in too far. i While holding the paper tray in place, pull out the paper support a until it clicks, and then unfold the paper support flap b. 2 1 f g Gently adjust the paper side guides to the paper with both hands. Make sure that the paper side guides touch the edges of the paper.
Connect the power cord and telephone line Important DO NOT connect the USB cable yet (if you are using a USB cable). a Connect the power cord. WARNING Since the machine is grounded through the power outlet, you can protect yourself from potentially hazardous electrical conditions on the telephone network by keeping the power cord connected to your machine when you connect it to a telephone line.
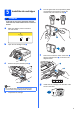
Install the ink cartridges e Turn the green knob on the protective yellow cap clockwise until it clicks to release the vacuum seal, then remove the cap a. WARNING If ink gets in your eyes, wash them out with water at once, and if irritation occurs consult a doctor. a Make sure that the power is turned on. The LCD shows: No Cartridge Install Ink BK Black C Cyan b Y M 1 Yellow Magenta Open the ink cartridge cover a.
h Gently push the ink cartridge until it clicks. After all the ink cartridges are installed close the ink cartridge cover. c If all lines are clear and visible, press Yes to finish the quality check. OK If you can see missing short lines, press No and go to d. Poor Note The machine will prepare the ink tube system for printing. This process will take approximately four minutes. Do not turn off the machine.
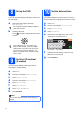
Choose a Receive Mode There are three possible receive modes: Fax Only, Fax/Tel and Manual. Are you using the built-in TAD? No See Digital TAD in Chapter 9 of the User's Guide. Yes Do you want to use the telephone features of your machine (if available) or an external telephone or external telephone answering device connected on the same line as the machine? a b c d e f Press MENU. Press a or b to display Initial Setup. Press Initial Setup. Press Receive Mode. Press Fax Only, Fax/Tel or Manual.
Set up the TAD 10 Set the date and time You must record an outgoing message in order to use the TAD mode. The machine displays the date and time, and if you set up the station ID, it will add it to each fax you send. a a b c d e b Record the TAD outgoing message (TAD Message). See Outgoing message (OGM) in Chapter 9 of the User’s Guide. Activate TAD mode. Press . The button will light when the mode is active. Press MENU. Press a or b to display Initial Setup. Press Initial Setup.
11 Enter personal information (station ID) You should store your name and fax number to be printed on all fax pages that you send. a b c d e Press MENU. Press a or b to display Initial Setup. Press Initial Setup. Press Station ID. Enter your fax number (up to 20 digits) on the Touchscreen, and then press OK. To enter numbers or special letters, press repeatedly until the character you want to enter appears, then press the character you want to use.
For MFC-790CW: Now go to Go to page 13. For MFC-990CW: Now go to To set up the cordless handset, go to Set up the cordless handset (MFC-990CW only) on page 11. To install your machine before you set up the cordless handset, go to page 13.
Set up the cordless handset (MFC-990CW only) 14 a 15 Install the battery Insert the connector a of the battery b in the direction shown below. a Charge the battery Place the cordless handset on the cradle with the dial pad facing forward. 2 1 b Place the battery in the position shown. Note • After battery replacement of the cordless handset, you should set the date and time. (See Date and Time in the DECT™ Handset BCL-D70 User’s Guide.
17 Choose a location Choose a location where the temperature remains between 10° C and 35° C. Do not put the cordless handset near heaters, air conditioners, water or chemicals. Do not expose the cordless handset to direct sunlight, excessive heat, moisture, or dust. Do not use the cordless handset near electromedical equipment. We recommend at least 3 m between the machine (base unit) or cordless handset and possible sources of radio interference.
19 Choose your connection type Windows® Macintosh® Wireless Network For Wireless Network Macintosh® Windows®, go to page 21 Macintosh®, go to page 26 Wired Network For Wired Network USB Windows®, go to page 14 Macintosh®, go to page 18 Windows® For USB interface cable Windows® and Macintosh®, go to page 29 13
USB Windows® For USB Interface Users (For Windows® 2000 Professional/XP/XP Professional x64 Edition/ Windows Vista®) 20 a Before you install Make sure that your computer is ON and you are logged on with Administrator rights. 21 a Important Install MFL-Pro Suite Put the supplied CD-ROM into your CD-ROM drive. If the model name screen appears, choose your machine. If the language screen appears, choose your language. • DO NOT connect the USB cable yet.
USB Note Windows® f Choose Local Connection, and then click Next. The installation continues. • If this screen appears, click OK and restart your computer. • If the installation does not continue automatically, open the main menu again by ejecting and then reinserting the CD-ROM or double-click the start.exe program from the root folder, and continue from b to install MFLPro Suite. g When this screen appears, go to the next step.
USB 22 Connect the USB cable Windows® c Carefully guide the USB cable through the trench as shown below, following the trench around and toward the back of the machine. Then connect the cable to your computer. Important • DO NOT connect the machine to a USB port on a keyboard or a non-powered USB hub. • Connect the machine directly to your computer. a Using both hands, use the plastic tabs on both sides of the machine to lift the scanner cover until it locks securely into the open position.
USB 23 a Connect the power cord Connect the power cord. The installation will continue automatically. The installation screens appear one after another. Windows® 24 a Finish and restart Click Finish to restart your computer. After restarting the computer, you must be logged on with Administrator rights. Important For Windows Vista®, when this screen appears, click the check box and click Install to complete the installation correctly. Finish The installation is now complete.
USB Macintosh® For USB Interface Users (For Mac OS® X 10.2.4 or greater) 20 a Before you install b Make sure your machine is connected to the power and your Macintosh® is ON. You must be logged on with Administrator rights. Connect the USB cable to the USB socket marked with a symbol. You will find the USB socket inside the machine on the right as shown below. LAN USB Important • For Mac OS® X 10.2.0 to 10.2.3 users, upgrade to Mac OS® X 10.2.4 or greater.
USB 22 a Install MFL-Pro Suite Macintosh® e Put the supplied CD-ROM into your CD-ROM drive. For Mac OS ® X 10.3.x or greater, the installation of MFL-Pro Suite is now complete. Go to step 23 on page 20. f Double-click the Start Here OSX icon to install. Choose USB. Choose Local Connection, and then click Next. Follow the on-screen instructions. h Choose XXX-XXXX (where XXX-XXXX is your model name), and then click Add. Note Please wait, it will take a few seconds for the software to install.
USB 23 Install Presto!® PageManager® When Presto!® PageManager® is installed OCR capability is added to Brother ControlCenter2. You can easily scan, share and organize photos and documents using Presto!® PageManager®. a Double-click the Presto! PageManager icon and follow the on-screen instructions. For Mac OS ® X 10.2.4 to 10.3.8 users, when this screen appears, click Go to download the software from the Brother Solutions Center website. Finish 20 The installation is now complete.
Wired Network Windows® For Wired Network Interface Users (For Windows® 2000 Professional/XP/XP Professional x64 Edition/ Windows Vista®) 20 a Before you install Make sure that your computer is ON and you are logged on with Administrator rights. 21 a Important Connect the network cable Using both hands, use the plastic tabs on both sides of the machine to lift the scanner cover until it locks securely into the open position. • If there are any programs running, close them.
Wired Network c Carefully guide the network cable to the trench as shown below, following the trench around and toward the back of the machine. Then, connect the cable to your network. Windows® 22 a Connect the power cord Connect the power cord. Note If both USB and LAN cables are being used, guide both cables through the trench with one on top of the other. Important Make sure that the cable does not restrict the cover from closing, or an error may occur.
Wired Network 23 a Install MFL-Pro Suite Put the supplied CD-ROM into your CD-ROM drive. If the model name screen appears, choose your machine. If the language screen appears, choose your language. Windows® Note • If this screen appears, click OK and restart your computer. • If the installation does not continue automatically, open the main menu again by ejecting and then reinserting the CD-ROM or double-click the start.exe program from the root folder, and continue from b to install MFLPro Suite.
Wired Network f Windows® Choose Wired Network Connection, and then click Next. Note • If the machine is configured for your network, choose the machine from the list, and then click Next. This window will not appear if there is only one machine connected on the network, it will be chosen automatically. g For Windows ® XP SP2/Windows Vista ® users, when this screen appears, choose Change the Firewall port settings to enable network connection and continue with the installation.
Wired Network Note For Windows Vista®, when this screen appears, click the check box and click Install to complete the installation correctly. i Windows® 24 a Finish and restart Click Finish to restart your computer. After restarting the computer, you must be logged on with Administrator rights. When the On-Line Registration screen is displayed, make your selection and follow the on-screen instructions.
Wired Network Macintosh® For Wired Network Interface Users (For Mac OS® X 10.2.4 or greater) 20 a Before you install b Make sure your machine is connected to the power and your Macintosh® is ON. You must be logged on with Administrator rights. Connect the network cable to the LAN socket marked with a symbol. You will find the LAN socket inside the machine on the left as shown below. LAN USB Important • For Mac OS® X 10.2.0 to 10.2.3 users, upgrade to Mac OS® X 10.2.4 or greater.
Wired Network 22 a b Install MFL-Pro Suite Put the supplied CD-ROM into your CD-ROM drive. Double-click the Start Here OSX icon to install. Macintosh® Note • If the machine is configured for your network, choose the machine from the list, and then click OK. This window will not appear if there is only one machine connected on the network, it will be chosen automatically. Go to e. • If this screen appears click OK.
Wired Network f For Mac OS ® X 10.2.4 to 10.2.8 users, click Add. Macintosh® 23 Install Presto!® PageManager® When Presto!® PageManager® is installed OCR capability is added to Brother ControlCenter2. You can easily scan, share and organize photos and documents using Presto!® PageManager®. g h i Make the selection shown below. Choose XXX-XXXX (where XXX-XXXX is your model name), and then click Add. a Double-click the Presto! PageManager icon and follow the on-screen instructions.
For Wireless Network Users For Wireless Network Interface Users 20 Before you begin First you must configure the wireless network settings of your machine to communicate with your network access point (router). After the machine is configured to communicate with your access point (router), computers on your network will have access to the machine. To use the machine from these computers, you will need to install the drivers and software.
For Wireless Network Users 21 Confirm your network environment (Infrastructure Mode) The following instructions will offer two methods for installing your Brother machine in a wireless network environment. Both methods are for infrastructure mode, using a wireless router or access point that uses DHCP to assign IP addresses. Choose a configuration method and proceed to the page indicated.
For Wireless Network Users Connecting the Brother machine to the wireless network 22 a b Configure the wireless settings (Typical Wireless Setup in infrastructure mode) No Authentication with WEP Encryption: Press Open System, then press WEP for the Encryption Type? Go to g. When Switch Network interface to wireless? is displayed, press Yes to accept. This will start the wireless setup wizard. To cancel, press No. The machine will search for available SSIDs.
For Wireless Network Users h Press TKIP or AES for Encryption Type? Enter the WPA/WPA2-PSK password you wrote down in step 21 on page 30 using the Touchscreen. You can use the d and c keys to move the cursor left and right. The letters appear in this order: upper case and then lower case. To enter numbers or special letters, press repeatedly until the character you want to enter appears. (For more information, see Entering Text for Wireless Settings on page 46.
For Wireless Network Users 22 a b c d Configure the wireless settings using the automatic wireless (onepush) method Confirm your wireless router or access point has the SecureEasySetup™, Wi-Fi Protected Setup™ or AOSS™ symbol as shown below. Place the Brother machine within range of a SecureEasySetup™, Wi-Fi Protected Setup™ or AOSS™ access point/router. The range may differ depending on your environment. Refer to the instructions provided with your access point/router.
For Wireless Network Users Wireless setup is now complete. To install MFL-Pro Suite, continue to step 23.
Wireless Network Windows® Install the Drivers & Software (For Windows® 2000 Professional/XP/XP Professional x64 Edition/ Windows Vista®) 23 a Before you install MFL-Pro Suite Make sure that your computer is ON and you are logged on with Administrator rights. 24 a Important Install MFL-Pro Suite Put the supplied CD-ROM into your CD-ROM drive. If the model name screen appears, choose your machine. If the language screen appears, choose your language.
Wireless Network Note f Windows® Choose Wireless Network Connection, and then click Next. • If this screen appears, click OK and restart your computer. • If the installation does not continue automatically, open the main menu again by ejecting and then reinserting the CD-ROM or double-click the start.exe program from the root folder, and continue from b to install MFLPro Suite. g Click on Checked and confirmed check box, and then click Next.
Wireless Network Note i • If the machine is configured for your network, choose the machine from the list, and then click Next. Windows® The installation of the Brother drivers will automatically start. The installation screens appear one after another. Important This window will not appear if there is only one machine connected on the network, it will be chosen automatically. DO NOT cancel any of the screens during the installation. It may take a few seconds for all screens to appear.
Wireless Network 25 a Finish and restart Click Finish to restart your computer. After restarting the computer, you must be logged on with Administrator rights. Note If an error message appears during the software installation, run the Installation Diagnostics located in Start/All Programs/Brother/ MFC-XXXX (where MFC-XXXX is your model name).
Wireless Network Macintosh® Install the Drivers & Software (For Mac OS® X 10.2.4 or greater) 23 a Before you install MFL-Pro Suite c Choose Wireless Network Connection, and then click Next. Make sure your machine is connected to the power and your Macintosh ® is ON. You must be logged on with Administrator rights. Important • For Mac OS® X 10.2.0 to 10.2.3 users, upgrade to Mac OS® X 10.2.4 or greater. (For the latest information for Mac OS® X, visit http://solutions.brother.
Wireless Network Note f • If the machine is configured for your network, choose the machine from the list, and then click OK. This window will not appear if there is only one machine connected on the network, it will be chosen automatically. Go to f. When this screen appears, click OK. For Mac OS® X 10.3.x or greater, the installation of MFL-Pro Suite is now complete. Go to step 25 on page 41. g • If your machine is not detected, go to step 21 on page 30 and setup the wireless connection again.
Wireless Network 25 Macintosh® Install Presto!® PageManager® When Presto!® PageManager® is installed OCR capability is added to Brother ControlCenter2. You can easily scan, share and organize photos and documents using Presto!® PageManager®. a Double-click the Presto! PageManager icon and follow the on-screen instructions. For Mac OS ® X 10.2.4 to 10.3.8 users, when this screen appears, click Go to download the software from the Brother Solutions Center website.
Install Optional Applications 1 Install FaceFilter Studio supported by Reallusion, Inc FaceFilter Studio is an easy-to-use borderless photo printing application. FaceFilter Studio also lets you edit your photo data and add photo effects such as red eye reduction or skin tone enhancement. 2 • The computer must be connected to the Internet. a b a b c Open the main menu again by ejecting and then reinserting the CD-ROM or by doubleclicking the start.exe program from the root folder.
Install Optional Applications 3 Windows® Install BookScan&Whiteboard Suite supported by Reallusion, Inc You can install BookScan&Whiteboard Suite. The BookScan Enhancer software can correct your scanned book images automatically. The Whiteboard Enhancer software cleans up and enhances text and images from photos taken of your whiteboard. (Internet access required.) Important • The machine must be ON and connected to the computer. • The computer must be connected to the Internet.
For Network Users BRAdmin Light utility (For Windows® users) BRAdmin Light is a utility for initial setup of Brother network connected devices. It also can search for Brother products on your network, view the status and configure basic network settings, such as IP address. For more information on BRAdmin Light, visit us at http://solutions.brother.com/.
For Network Users BRAdmin Light utility (For Mac OS® X users) BRAdmin Light is a utility for initial setup of Brother network connected devices. It also can search for Brother products on your network, view the status and configure basic network settings, such as IP address from a computer running Mac OS® X 10.2.4 or greater. The BRAdmin Light software will be installed automatically when you install the printer driver.
For Wireless Network Users Restore the network settings to factory default To restore all network settings of the internal Print/Scan server to factory default, please follow the steps below. a b c d e f g Make sure the machine is not operating, then disconnect all the cables from the machine (except the power cord). Press MENU. Press a or b to display Network and press Network. Press a or b to display Factory Reset and press Factory Reset. Press Yes. Hold down Yes for 2 seconds to confirm.
Consumables Replacement consumables When the time comes to replace ink cartridges, an error message will be indicated on the LCD. For more information about the ink cartridges for your machine, visit http://www.brother.com/original/ or contact your local Brother re-seller. Ink cartridge Black Yellow Cyan Magenta LC1100BK LC1100Y LC1100C LC1100M What is Innobella™? Innobella™ is a range of genuine consumables offered by Brother.