
User Manual


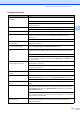
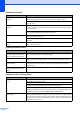


Table Of Contents
- USER’S GUIDE MFC-790CW MFC-990CW
- Approval Information and Compilation and Publication Notice
- Table of Contents
- Section I: General
- 1 General Information
- 2 Loading paper and documents
- 3 General setup
- 4 Security features
- Section II: Fax
- 5 Sending a Fax
- Entering Fax mode
- Broadcasting (Monochrome only)
- Additional sending operations
- Sending faxes using multiple settings
- Contrast
- Changing fax resolution
- Dual access (Monochrome only)
- Real time transmission
- Overseas Mode
- Delayed Faxing (Monochrome only)
- Delayed Batch Transmission (Monochrome only)
- Checking and cancelling waiting jobs
- Setting your changes as a new default
- Restoring all settings to the factory settings
- Sending a fax manually
- Sending a fax at the end of a conversation
- Out of Memory message
- 6 Receiving a Fax
- 7 Telephone and External devices
- Voice operations
- Telephone Service for Australia
- Telephone Service for New Zealand
- Telephone Service for Some Countries
- Connecting an external TAD (telephone answering device)
- External and extension telephones
- 8 Dialling and storing numbers
- 9 Digital TAD
- 10 Printing Reports
- 11 Polling
- 5 Sending a Fax
- Section III: Copy
- Section IV: Direct Photo Printing
- 13 Printing photos from a memory card or USB Flash memory drive
- 14 Printing photos from a camera
- 15 Wireless photo printing (MFC-990CW only)
- Section V: Software
- Section VI: Appendixes
- A Safety and Legal
- B Troubleshooting and Routine Maintenance
- Troubleshooting
- Error and Maintenance messages
- Routine maintenance
- Replacing the ink cartridges
- Cleaning the outside of the machine
- Cleaning the scanner glass
- Cleaning the machine’s printer platen
- Cleaning the paper pick-up roller
- Cleaning the print head
- Checking the print quality
- Checking the print alignment
- Checking the ink volume
- Uninstalling and installing the handset and handset cradle (MFC-790CW only)
- Machine Information
- Packing and shipping the machine
- C Menu and Features
- D Specifications
- E Glossary
- Index
- brother ARL/ASA/NZ

Troubleshooting and Routine Maintenance
145
B
Receiving Faxes
Difficulty Suggestions
Cannot receive a fax. Check all line cord connections.
Make sure the machine is in the correct receiving mode for your setup. (See
Receive mode settings on page 46.)
If you often have interference on the telephone line, try changing the menu setting
of Compatibility to Basic(for VoIP). (See Telephone line interference
on page 149.)
Sending Faxes
Difficulty Suggestions
Cannot send a fax. Check all line cord connections.
Make sure that the Fax key is illuminated. (See Entering Fax mode
on page 34.)
Ask the other party to check that the receiving machine has paper.
Print the Transmission Verification Report and check for an error. (See Reports
on page 84.)
Transmission Verification Report
says ‘Result:ERROR’.
There is probably temporary noise or static on the line. Try sending the fax again.
If you send a PC FAX message and get
‘Result:ERROR’ on the Transmission
Verification Report, your machine may be out of memory. To gain extra memory,
you can turn off Memory Receive (see Turning off Memory Receive Operations
on page 50), print fax messages in memory (see Printing a fax from the memory
on page 54) or cancel a Delayed Fax or Polling Job (see Cancelling a fax in
progress on page 36 or Checking and cancelling waiting jobs on page 40). If the
problem continues, ask the telephone company to check your telephone line.
If you often get transmission errors due to possible interference on the telephone
line, try changing the menu setting of Compatibility to Basic(for VoIP). (See
Telephone line interference on page 149.)
Poor fax send quality. Try changing your resolution to Fine or S.Fine. Make a copy to check your
machine's scanner operation. If the copy quality is not good, clean the scanner.
(See Cleaning the scanner glass on page 164.)
Vertical black lines when sending. Black vertical lines on faxes you send are typically caused by dirt or correction fluid
on the glass strip. Clean the glass strip. (See Cleaning the scanner glass
on page 164.)