
User Manual


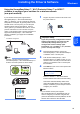


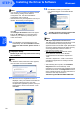
Table Of Contents
- Quick Setup Guide MFC-7840W
- Symbols used in this guide
- Table of Contents
- Getting Started
- STEP 1 Setting Up the Machine
- STEP 2 Installing the Driver & Software
- Supplied CD-ROM ‘MFL-Pro Suite’
- Windows®
- For USB Interface Cable Users (For Windows® 2000 Professional/XP/XP Professional x64 Edition/Windows Vista®)
- For Wired Network Interface Users (For Windows® 2000 Professional/XP/XP Professional x64 Edition/Windows Vista®)
- For Wireless Network Interface Users (For Windows® 2000 Professional/XP/XP Professional x64 Edition/Windows Vista®) in infrastructure mode
- Connecting your wireless machine and wireless network together and installing the printer driver in infrastructure mode
- Using the Setup Wizard from the control panel LAN menu for wireless network configuration
- Using the SecureEasySetup™, Wi-Fi Protected Setup™ or AOSS™ software to configure your machine for a wireless network (one-push method)
- Macintosh®
- For USB Interface Cable Users
- For Wired Network Interface Users
- For Wireless Network Interface Users (For Mac OS® X 10.2.4 or greater) in infrastructure mode
- Connecting your wireless machine and wireless network together and installing the printer driver in infrastructure mode
- Using the Setup Wizard from the control panel LAN menu for wireless network configuration (Infrastructure Mode)
- Using the SecureEasySetup™, Wi-Fi Protected Setup™ or AOSS™ software to configure your machine for a wireless network (one push-mode)
- For Network Users
- Consumables and Options
- brother UK/IRE/SAF

Installing the Driver & Software
27
Windows
®
Windows
®
Wireless
Network
10 Choose Wireless Network Connection, and
then click Next.
Note
If you want to install the PS driver (Brother’s
BR-Script Driver), choose Custom Install and
then follow the on-screen instructions. When the
Select Features screen appears, check
PS Printer Driver, and then continue following the
on-screen instructions.
11 Click on the Checked and confirmed check
box, and then click Next. Follow the on screen
instructions.
12 After reading and accepting the ScanSoft™
PaperPort™ 11SE License Agreement,
click Yes.
The installation of ScanSoft™ PaperPort™
11SE will automatically start and is followed by
the installation of MFL-Pro Suite.
13 When the Brother MFL-Pro Suite Software
License Agreement window appears, click Yes
if you agree to the Software License
Agreement.
14 For Windows
®
XP SP2/XP Professional x64
Edition/Windows Vista
®
users, when this
screen appears, choose Change the Firewall
port settings to enable network connection
and continue with the installation.
(Recommended) and click Next.
If you are not using the Windows
®
Firewall, see
the User’s Guide for your software for
information on how to add the following
network ports.
For network scanning, add UDP port
54925.
For network PC-Fax receiving, add UDP
port 54926.
If you still have trouble with your network
connection, add UDP port 137.
15 If the machine is configured for your network,
choose the machine from the list, and then click
Next.
If your machine shows APIPA in the IP
Address field, click Configure IP Address
and enter an IP address for your machine that
is suitable for your network.