
User Manual


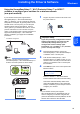


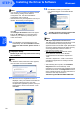
Table Of Contents
- Quick Setup Guide MFC-7840W
- Symbols used in this guide
- Table of Contents
- Getting Started
- STEP 1 Setting Up the Machine
- STEP 2 Installing the Driver & Software
- Supplied CD-ROM ‘MFL-Pro Suite’
- Windows®
- For USB Interface Cable Users (For Windows® 2000 Professional/XP/XP Professional x64 Edition/Windows Vista®)
- For Wired Network Interface Users (For Windows® 2000 Professional/XP/XP Professional x64 Edition/Windows Vista®)
- For Wireless Network Interface Users (For Windows® 2000 Professional/XP/XP Professional x64 Edition/Windows Vista®) in infrastructure mode
- Connecting your wireless machine and wireless network together and installing the printer driver in infrastructure mode
- Using the Setup Wizard from the control panel LAN menu for wireless network configuration
- Using the SecureEasySetup™, Wi-Fi Protected Setup™ or AOSS™ software to configure your machine for a wireless network (one-push method)
- Macintosh®
- For USB Interface Cable Users
- For Wired Network Interface Users
- For Wireless Network Interface Users (For Mac OS® X 10.2.4 or greater) in infrastructure mode
- Connecting your wireless machine and wireless network together and installing the printer driver in infrastructure mode
- Using the Setup Wizard from the control panel LAN menu for wireless network configuration (Infrastructure Mode)
- Using the SecureEasySetup™, Wi-Fi Protected Setup™ or AOSS™ software to configure your machine for a wireless network (one push-mode)
- For Network Users
- Consumables and Options
- brother UK/IRE/SAF

Installing the Driver & Software
25
Windows
®
Windows
®
Wireless
Network
Using the SecureEasySetup™, Wi-Fi Protected Setup™ or AOSS™
software to configure your machine for a wireless network
(one-push method)
If your wireless access point supports either
SecureEasySetup™, Wi-Fi Protected Setup™
(PBC
1
) or AOSS™, you can configure the machine
easily without a computer. By pushing a button on the
wireless router or access point, you can setup the
wireless network and security settings. See the
user’s guide for your wireless LAN router or access
point for instructions on how to access one-push
mode. If your wireless router or access point does not
support SecureEasySetup™, Wi-Fi Protected
Setup™ or AOSS™ go to page 22 for installation
instructions.
1
Push Button Configuration
Note
Routers or access points that support
SecureEasySetup™, Wi-Fi Protected Setup™ or
AOSS™ have the symbols as shown below.
1 Plug the AC power cord into an AC outlet. Turn
the power switch on.
Improper Setup
If you have previously configured the wireless
settings of the machine you must reset the
network (LAN) settings before you can
configure the wireless settings again.
Press Menu, 5, 2, 6 (or Menu, 5, 0, 1) and then
press 1 to accept the change.
2 Place the Brother machine close to the
SecureEasySetup™, Wi-Fi Protected Setup™
or AOSS™ router or access point .
3 Push the SecureEasySetup™, Wi-Fi
Protected Setup™ or AOSS™ button on your
wireless router or access point. See the user’s
guide for your wireless router or access point
for instructions.
4 Press Menu, 5, 2, 3 on the control panel of the
Brother machine.
WLAN Enable?
1.On 2.Off
Press 1 to choose On. The wired network
interface will become inactive with this setting.
This feature will automatically detect which
mode (SecureEasySetup™, Wi-Fi Protected
Setup™ or AOSS™) your access point uses to
configure your machine.
Note
If your wireless access point supports
Wi-Fi Protected Setup™ (PIN Method) and you
want to configure your machine using the PIN
(Personal Identification Number) Method, see the
Network User’s Guide on the CD-ROM.