
User Manual

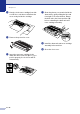


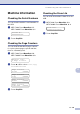

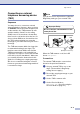

Table Of Contents
- USER’S GUIDE MFC-7420/MFC-7820N
- APPROVAL INFORMATION
- Compilation and Publication Notice
- EC Declaration of Conformity
- Safety precautions
- Quick Reference Guide
- Table of Contents
- 1 Introduction
- 2 Getting started
- Initial setup
- General Setup
- Setting the Mode Timer
- Setting the Paper Type
- Setting the Paper Size
- Setting the Ring Volume
- Setting the Beeper Volume
- Setting the Speaker Volume
- Turning on Automatic Daylight Savings Time
- Toner Save
- Sleep Time
- Setting the LCD Contrast
- Security
- TX Lock (MFC-7420 only)
- Memory Security (MFC-7820N only)
- Setting Lock
- 3 Setup Send
- 4 Setup Receive
- 5 Quick-Dial numbers and dialling options
- 6 Remote Fax Options
- 7 Printing reports
- 8 Making copies
- 9 Software and Network Features
- 10 Important information
- 11 Troubleshooting and routine maintenance
- Appendix A
- Appendix B
- Glossary
- Specifications
- Index
- Remote Retrieval Access card
- brother UK/IRE/SAF

Chapter 11
11 - 29
2
Hold down the lock lever on the left and
pull the toner cartridge out of the drum
unit.
Note
Discard the used drum unit according to local
regulations, keeping it separate from
domestic waste. Be sure to seal the drum unit
tightly so toner powder does not spill out of
the unit. If you have questions, call your local
waste disposal office.
3
Unpack the new drum unit.
4
Install the toner cartridge into the new
drum unit until it clicks into place. If you
put it in properly, the lock lever will lift
automatically.
5
Install the drum unit and toner cartridge
assembly in the machine.
Do not close the front cover.
6
Press Options.
To confirm you are installing a new
drum, press 1.
7
When the LCD shows Accepted, close
the front cover.
Note
If toner scatters and your hands or clothes get
dirty, immediately wipe off or wash with cold
water.
CAUTION
Wait to unpack the new drum unit until
immediately before installing it. Place the
old drum unit into the plastic bag.
Replace Drum?
1.Yes 2.No