
User Manual
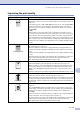
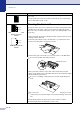

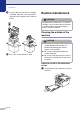

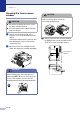
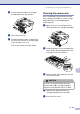
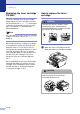
Table Of Contents
- USER’S GUIDE MFC-7420/MFC-7820N
- APPROVAL INFORMATION
- Compilation and Publication Notice
- EC Declaration of Conformity
- Safety precautions
- Quick Reference Guide
- Table of Contents
- 1 Introduction
- 2 Getting started
- Initial setup
- General Setup
- Setting the Mode Timer
- Setting the Paper Type
- Setting the Paper Size
- Setting the Ring Volume
- Setting the Beeper Volume
- Setting the Speaker Volume
- Turning on Automatic Daylight Savings Time
- Toner Save
- Sleep Time
- Setting the LCD Contrast
- Security
- TX Lock (MFC-7420 only)
- Memory Security (MFC-7820N only)
- Setting Lock
- 3 Setup Send
- 4 Setup Receive
- 5 Quick-Dial numbers and dialling options
- 6 Remote Fax Options
- 7 Printing reports
- 8 Making copies
- 9 Software and Network Features
- 10 Important information
- 11 Troubleshooting and routine maintenance
- Appendix A
- Appendix B
- Glossary
- Specifications
- Index
- Remote Retrieval Access card
- brother UK/IRE/SAF

Troubleshooting and routine maintenance
11 - 24
11
4
Put the drum unit and toner cartridge
assembly back into the machine.
5
Close the front cover.
6
Plug the machine’s power cord back into
the electrical socket first, and then plug
in the telephone line cord.
Turn on the machine’s power switch.
Cleaning the corona wire
We recommend placing the drum unit and
toner cartridge assembly on a cloth or large
disposable paper to avoid spilling and
scattering toner.
1
Open the front cover and pull out the
drum unit and toner cartridge assembly.
2
Clean the primary corona wire inside the
drum unit by gently sliding the blue tab
from right to left several times.
3
Return the blue tab and snap it into the
Home position (
▼).
4
Reinstall the drum unit and toner
cartridge assembly in the machine.
5
Close the front cover.
CAUTION
If you do not return the blue tab to the
Home position (
▼), your printed pages
may have vertical black stripes on them.