
User Manual

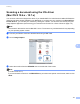
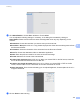

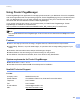
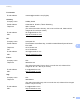


Table Of Contents
- Software User’s Guide
- Applicable models
- Definitions of notes
- Compilation and publication notice
- IMPORTANT NOTE
- Table of Contents
- Section I: Machine operation keys
- Section II: Windows®
- 2 Printing
- 3 Scanning
- Scanning a document using the TWAIN driver
- Scanning a document using the WIA driver
- Scanning a document using the WIA driver (Windows Photo Gallery and Windows Fax and Scan)
- Using Nuance™ PaperPort™ 12SE
- 4 ControlCenter4
- 5 Remote Setup
- 6 Brother PC-FAX Software
- Section III: Apple Macintosh
- 7 Printing and Faxing
- 8 Scanning
- 9 ControlCenter2
- 10 Remote Setup
- Section IV: Using the Scan key
- Index

Scanning
115
8
A6 105 x 148 mm
Executive 184.1 x 266.7 mm
10x15cm
13x20cm
9x13cm
13x18cm
Postcard 1 100 x 148 mm
Postcard 2 (Double) 148 x 200 mm
Custom (User adjustable from 8.9 8.9 mm to 215.9 355.6 mm.)
After you choose a custom size, you can adjust the scanning area. Click and hold the mouse button as
you drag the mouse to crop the image.
Width: Enter the custom width.
Height: Enter the custom height.
Adjusting the Image 8
Brightness
Adjust the setting (-50 to 50) to get the best image. The default value is 0, representing an average, and
is usually suitable for most images.
You can set the Brightness level by dragging the slider to the right or left to lighten or darken the image.
You can also enter a value in the box to set the level.
If the scanned image is too light, set a lower Brightness level and scan the document again.
If the image is too dark, set a higher Brightness level and scan the document again.
Contrast
You can increase or decrease the contrast level by moving the slider to the left or right. An increase
emphasizes dark and light areas of the image, while a decrease reveals more detail in grey areas. You
can also enter a value in the box to set the Contrast.
Note
The Contrast setting is only available if you have set Scan Type to Gray (Error Diffusion) or True Gray.