
User Manual
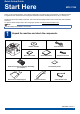
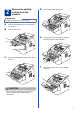


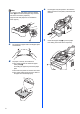


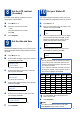

Table Of Contents
- Quick Setup Guide MFC-7290
- Start Here
- 1 Unpack the machine and check the components
- 2 Remove the packing material from the machine
- 3 Attach the ADF Document Output Support
- 4 Install the Handset
- 5 Load paper in the paper tray
- 6 Connect the power cord and telephone line
- 7 Choose a Receive Mode
- 8 Set the LCD contrast (if needed)
- 9 Set the date and time
- 10 Set your Station ID
- 11 Fax Transmission Report
- 12 Set the telephone line compatibility
- 13 Dial Prefix
- 14 Automatic Daylight Saving Time
- 15 Choose your Operating System
- For Windows® Users (Windows® XP/XP Professional x64 Edition/Windows Vista®/Windows® 7)
- For Macintosh Users (Mac OS X 10.5.8 - 10.7.x)
- Other Information
- Consumables
- Start Here

7
6
Connect the power cord
and telephone line
a Connect the AC power cord to the machine,
and then plug it into an AC power outlet.
b Turn the machine’s power switch on.
c Connect the telephone line cord. Connect one
end of the telephone line cord to the jack on the
machine marked LINE and the other end to a
modular wall jack.
WARNING
The machine must be grounded using a
3-prong plug.
Since the machine is grounded through the
power outlet, you can protect yourself from
potentially hazardous electrical conditions on
the telephone network by keeping the power
cord connected to your machine when you
connect it to a telephone line. Similarly, you
can protect yourself when you want to move
your machine by disconnecting the telephone
line first and then the power cord.
IMPORTANT
DO NOT connect the interface cable
yet.
IMPORTANT
The telephone line cord MUST be connected to
the jack on the machine marked LINE.
Note
If you are sharing one telephone line with an
external telephone, connect it as shown below.
Before you connect the external telephone,
remove the protective cap c from the EXT. jack
on the machine.
a Extension telephone
b External telephone
c Protective cap
3
1
2