
User Manual
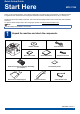
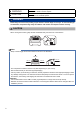
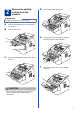


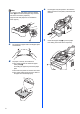


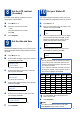

Table Of Contents
- Quick Setup Guide MFC-7290
- Start Here
- 1 Unpack the machine and check the components
- 2 Remove the packing material from the machine
- 3 Attach the ADF Document Output Support
- 4 Install the Handset
- 5 Load paper in the paper tray
- 6 Connect the power cord and telephone line
- 7 Choose a Receive Mode
- 8 Set the LCD contrast (if needed)
- 9 Set the date and time
- 10 Set your Station ID
- 11 Fax Transmission Report
- 12 Set the telephone line compatibility
- 13 Dial Prefix
- 14 Automatic Daylight Saving Time
- 15 Choose your Operating System
- For Windows® Users (Windows® XP/XP Professional x64 Edition/Windows Vista®/Windows® 7)
- For Macintosh Users (Mac OS X 10.5.8 - 10.7.x)
- Other Information
- Consumables
- Start Here

6
c Fan the stack of paper well to avoid paper jams
and misfeeds.
d Put paper in the tray and make sure:
The paper is below the maximum paper
mark (bbb) a.
Over filling the paper tray will cause paper
jams.
The side to be printed on must be face down.
The paper guides gently touch the sides of
the paper so it will feed properly.
e Put the paper tray firmly back in the machine.
Make sure that it is completely inserted into the
machine.
f Unfold the support flap a to prevent paper
from sliding off the face-down output tray.
Note
For Legal or Folio size paper, press the release
button a in the bottom of the paper tray and then
pull out the back of the paper tray.
(Legal or Folio size paper are not available in
some regions.)
11
1
1
1