
User's Manual


Table Of Contents
- USER’S GUIDE FAX-2820/FAX-2910/FAX-2920/MFC-7220/MFC-7225N
- Brother numbers
- Ordering accessories and supplies
- Safety precautions
- Quick Reference Guide
- Table of Contents
- 1 Introduction
- 2 Getting started
- Initial setup
- General Setup
- Setting the Mode Timer (FAX-2820, FAX-2910 and FAX-2920 only)
- Setting the Mode Timer (MFC-7220 and MFC-7225N only)
- Setting the Paper Type
- Setting the Paper Size
- Setting the Ring Volume
- Setting the Beeper Volume
- Setting the Speaker Volume
- Setting the Handset Volume
- Choosing the Handset Volume (For Volume Amplify)
- Setting Volume Amplify
- Turning on Automatic Daylight Savings Time
- Toner Save
- Sleep Time
- Setting the LCD Contrast
- Security
- TX Lock (FAX-2820, FAX-2910 and MFC-7220 only)
- Memory Security (FAX-2920 and MFC-7225N only)
- Setting Lock
- 3 Setup Send
- 4 Setup Receive
- 5 Quick-Dial numbers and dialing options
- 6 Remote Fax Options
- 7 Printing reports
- 8 Making copies
- 9 Software and Network Features (MFC-7220 and MFC-7225N only)
- 10 Important information
- Standard telephone and FCC Notices These notices are in effect on models sold and used in the United States only.
- Federal Communications Commission (FCC) Declaration of Conformity (USA only)
- Industry Canada Compliance Statement (Canada only)
- Disconnect device
- LAN connection (MFC-7225N only)
- Laser safety
- FDA regulations
- Important safety instructions
- Trademarks
- 11 Troubleshooting and routine maintenance
- Appendix A
- Appendix B
- Glossary
- Specifications
- Product description
- General
- Print media
- Copy
- Fax
- Scanner (MFC-7220 and MFC-7225N only)
- Printer (not available for FAX-2910)
- Interfaces (not available for FAX-2910)
- Download the optional software from the Brother Web Site (FAX-2820 and FAX-2920 users only)
- At the same time, you can download the manual for setting up and using the PC-Fax software.
- Computer requirements (not available for FAX-2910)
- Consumable items
- Network (LAN) (MFC-7225N only)
- Index
- Remote Retrieval Access card
- brother USA/CAN
Troubleshooting and routine maintenance
11 - 24
11
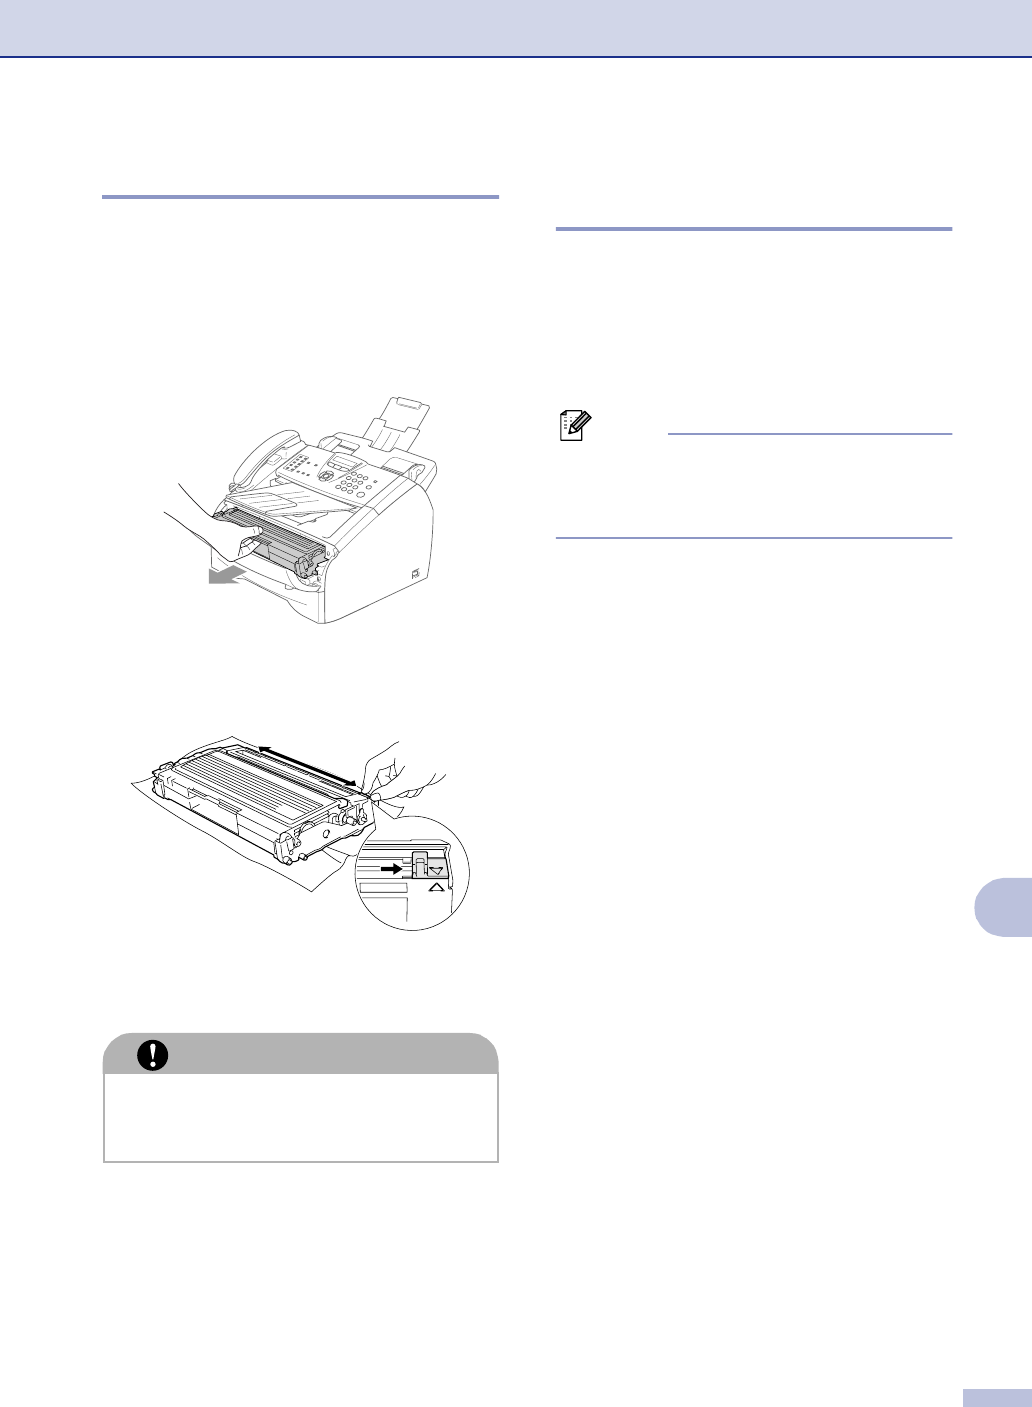
Cleaning the corona wire
We recommend placing the drum unit and
toner cartridge assembly on a cloth or large
disposable paper to avoid spilling and
scattering toner.
1
Open the front cover and pull out the
drum unit and toner cartridge assembly.
2
Clean the primary corona wire inside the
drum unit by gently sliding the blue tab
from right to left several times.
3
Return the blue tab and snap it into the
Home position (
▼).
4
Reinstall the drum unit and toner
cartridge assembly in the machine.
5
Close the front cover.
Replacing the toner cartridge
(TN-350)
The toner cartridge can print up to 2,500
pages. When the toner cartridge is running
low, the LCD shows
Toner Low
. Actual page
count will vary depending on your average
type of document (i.e., standard letter,
detailed graphics).
Note
It is a good idea to keep a new toner cartridge
ready for use when you see the
Toner Low
warning.
Discard the used toner cartridge according to
local regulations, keeping it separate from
domestic waste. Be sure to seal the toner
cartridge tightly so toner powder does not
spill out of the cartridge. If you have
questions, call your local waste disposal
office.
We recommend that you clean the machine
and drum unit when you replace the toner
cartridge. (See Cleaning the laser scanner
window on page 11-22 and Cleaning the
drum unit on page 11-17.)
CAUTION
If you do not return the blue tab to the
Home position (
▼), your printed pages
may have vertical black stripes on them.