
User's Manual


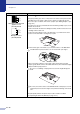


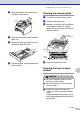
Table Of Contents
- USER’S GUIDE FAX-2820/FAX-2910/FAX-2920/MFC-7220/MFC-7225N
- Brother numbers
- Ordering accessories and supplies
- Safety precautions
- Quick Reference Guide
- Table of Contents
- 1 Introduction
- 2 Getting started
- Initial setup
- General Setup
- Setting the Mode Timer (FAX-2820, FAX-2910 and FAX-2920 only)
- Setting the Mode Timer (MFC-7220 and MFC-7225N only)
- Setting the Paper Type
- Setting the Paper Size
- Setting the Ring Volume
- Setting the Beeper Volume
- Setting the Speaker Volume
- Setting the Handset Volume
- Choosing the Handset Volume (For Volume Amplify)
- Setting Volume Amplify
- Turning on Automatic Daylight Savings Time
- Toner Save
- Sleep Time
- Setting the LCD Contrast
- Security
- TX Lock (FAX-2820, FAX-2910 and MFC-7220 only)
- Memory Security (FAX-2920 and MFC-7225N only)
- Setting Lock
- 3 Setup Send
- 4 Setup Receive
- 5 Quick-Dial numbers and dialing options
- 6 Remote Fax Options
- 7 Printing reports
- 8 Making copies
- 9 Software and Network Features (MFC-7220 and MFC-7225N only)
- 10 Important information
- Standard telephone and FCC Notices These notices are in effect on models sold and used in the United States only.
- Federal Communications Commission (FCC) Declaration of Conformity (USA only)
- Industry Canada Compliance Statement (Canada only)
- Disconnect device
- LAN connection (MFC-7225N only)
- Laser safety
- FDA regulations
- Important safety instructions
- Trademarks
- 11 Troubleshooting and routine maintenance
- Appendix A
- Appendix B
- Glossary
- Specifications
- Product description
- General
- Print media
- Copy
- Fax
- Scanner (MFC-7220 and MFC-7225N only)
- Printer (not available for FAX-2910)
- Interfaces (not available for FAX-2910)
- Download the optional software from the Brother Web Site (FAX-2820 and FAX-2920 users only)
- At the same time, you can download the manual for setting up and using the PC-Fax software.
- Computer requirements (not available for FAX-2910)
- Consumable items
- Network (LAN) (MFC-7225N only)
- Index
- Remote Retrieval Access card
- brother USA/CAN

Troubleshooting and routine maintenance
11 - 18
11
Black toner marks across the page
The drum unit may be damaged. Put in a new drum unit (See Replacing the drum
unit (DR-350) on page 11-27).
Make sure that you use paper that meets our specifications. (See About paper on
page 1-8.)
If you use label sheets for laser printers, the glue from the sheets may sometimes
stick to the OPC drum surface. Clean the drum unit. (See Cleaning the drum unit
on page 11-17.)
Do not use paper that has clips or staples because they will scratch the surface of
the drum.
If the unpacked drum unit is in direct sunlight or room light, the unit may be
damaged.
White lines across the page
Make sure that you use paper that meets our specifications. A rough surfaced
paper or thick print media can cause the problem.
Make sure that you choose the appropriate media type in the printer driver or in
the machine’s Paper Type menu setting. (See About paper on page 1-8 and Basic
tab in the Software User’s Guide on the CD-ROM.)
The problem may disappear by itself. Print multiple pages to clear this problem,
especially if the machine has not been used for a long time.
The drum unit may be damaged. Put in a new drum unit. (See Replacing the drum
unit (DR-350) on page 11-27.)
Lines across the page
Clean the inside of the machine and the primary corona wire in the drum unit. (See
Cleaning the corona wire on page 11-24.)
The drum unit may be damaged. Put in a new drum unit. (See Replacing the drum
unit (DR-350) on page 11-27.)
Black lines down the page
Printed pages have toner stains down
the page.
Clean the primary corona wire of the drum unit.
Make sure the primary corona wire blue tab is at the home position (▲).
The drum unit may be damaged. Install a new drum unit. (See Replacing the drum
unit (DR-350) on page 11-27.)
The toner cartridge may be damaged. Put in a new toner cartridge. (See Replacing
the toner cartridge (TN-350) on page 11-24.) Make sure that a torn piece of paper
is not inside the machine covering the laser scanner window.
The fixing unit may be smudged. Call Brother Customer Service at
1-800-284-4329 (in USA) or 1-877-BROTHER (in Canada).
White lines down the page
You may clear the problem by wiping the laser scanner window with a soft cloth.
(See Cleaning the laser scanner window on page 11-22.)
The toner cartridge may be damaged. Put in a new toner cartridge. (See Replacing
the toner cartridge (TN-350) on page 11-24.)
Page skewed
Make sure the paper or other print media is loaded properly in the paper tray and
that the guides are not too tight or too loose against the paper stack.
Set the paper guides correctly.
If you are using the manual feed slot, see To load paper or other media in the
manual feed slot on page 1-11.
The paper tray may be too full.
Check the paper type and quality. (See About paper on page 1-8.)
Curl or wave
Check the paper type and quality. High temperatures and high humidity will cause
paper to curl.
If you don’t use the machine very often, the paper may have been in the paper tray
too long. Turn over the stack of paper in the paper tray. Also, fan the paper stack
and then rotate the paper 180° in the paper tray.
Examples of poor print quality Recommendation
ABCDEFGH
abcdefghijk
ABCD
abcde
01234
ABCDEFGH
abcdefghijk
ABCD
abcde
01234
ABCDEFGH
abcdefghijk
ABCD
abcde
01234
ABCDEFGH
abcdefghijk
ABCD
abcde
01234
ABCDEFGH
abcdefghijk
ABCD
abcde
01234
A
B
C
D
E
F
G
H
ab
cd
efg
h
ijk
ABCD
abcde
01234