
User Manual


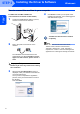


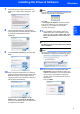
Table Of Contents

Installing the Driver & Software
7
Windows
®
USB
Windows
®
For MFC-3360C users
1 Connect the USB cable to the USB socket
marked with a symbol. You will find the
USB socket next to the handset cord socket as
shown below.
2 Connect the USB cable to your computer.
Improper Setup
• DO NOT connect the machine to a USB port on
a keyboard or a non-powered USB hub.
Brother recommends that you connect the
machine directly to your computer.
• Make sure that the cable does not restrict the
cover from closing, or an error may occur.
• Make sure you use a USB 2.0 cable that is no
longer than 2 metres.
3 Turn on the machine by connecting the power
cord.
The installation of the Brother drivers will
automatically start. The installation screens
appear one after another, please wait for a
while.
Improper Setup
DO NOT try to cancel any of the screens during
this installation.
4 When the On-Line Registration screen is
displayed, make your selection and follow the
on-screen instructions.
Once you have completed the registration
process, close your web browser to return to
this window.
Then click Next.
5 Click Finish to restart your computer. After
restarting the computer, you must be logged on
with Administrator rights.
The MFL-Pro Suite has been installed
completely.
Note
MFL-Pro Suite includes the Printer Driver,
Scanner Driver, Brother ControlCenter3,
ScanSoft™ PaperPort™ 11SE. ScanSoft™
PaperPort™ 11SE is a document management
application for scanning and viewing documents.