Windows Vista®/Windows® 7 Installation Guide Before you can use the machine, you must set up the hardware and install the driver. Please read the ‘Quick Setup Guide’ and this ‘Windows Vista®/Windows® 7 Installation Guide’ for set up and installation instructions. STEP 1 Setting Up the Machine First, please follow STEP 1 Setting Up the Machine in the Quick Setup Guide. Then return to STEP 2 Installing the driver & software in this installation guide.
Table of Contents Before Starting Before using this manual.............................................................................................................................. 2 Supplied CD-ROM for Windows Vista ®/Windows ® 7 ................................................................................... 2 Symbols used in this guide ..........................................................................................................................
Before Starting 1 1 Before using this manual This manual is for Windows Vista®/Windows® 7 users only. This installation guide explains how to install the MFC-Pro Suite software and multifunction drivers for Windows Vista®/Windows® 7 and other information about Windows Vista®/Windows® 7. Before installing the driver and software, please follow the steps in the Getting Started section and STEP 1 Setting Up the Machine in the Quick Setup Guide.
STEP 2 Installing the Driver & Software Follow the instructions on this page for the interface you are going to use. For the latest drivers, documentation, and to find the best solution for your problem, access the Brother Solutions Center directly from the CD-ROM / Driver or visit http://solutions.brother.com/. Windows® For USB Interface Users .................................................................................................. 4 How to connect the machine to your computer................
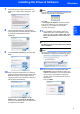
STEP 2 Installing the Driver & Software Windows® 1 Windows® USB 1 For USB Interface Users Improper Setup 4 The CD-ROM main menu will appear. Click Install MFL-Pro Suite. DO NOT connect the interface cable. Connecting the interface cable is done when installing the driver. Important If this window does not appear, use Windows® Explorer to run the start.exe program from the root folder of the Brother CD-ROM.
Installing the Driver & Software 7 The installation of ScanSoft™ PaperPort™ 11SE will automatically start and is followed by the installation of MFL-Pro Suite. 9 When this screen appears, go to the next step. When the Brother MFL-Pro Suite Software License Agreement window appears, click Yes if you agree to the Software License Agreement. Windows® USB 6 Windows® 10 Go to the “How to connect the machine to your computer” steps for your model.
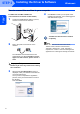
STEP 2 Installing the Driver & Software Windows® How to connect the machine to your computer Windows® USB For MFC-7220 and MFC-7225N users (The illustrations are based on MFC-7225N.) 1 Connect the USB interface cable to your PC, and then connect it to the machine. 4 Click Finish to restart your computer. After restarting the computer, you must be logged on with Administrator rights. The MFL-Pro Suite has been installed completely. 2 Plug in the power cord and turn on the machine.
Installing the Driver & Software Windows® For MFC-3360C users 2 Connect the USB cable to the USB socket marked with a symbol. You will find the USB socket next to the handset cord socket as shown below. Improper Setup DO NOT try to cancel any of the screens during this installation. 4 When the On-Line Registration screen is displayed, make your selection and follow the on-screen instructions. Once you have completed the registration process, close your web browser to return to this window.
STEP 2 2 Installing the Driver & Software Windows® For Network Interface Users (MFC-7225N only) Important 5 Make sure that you have finished the instructions from STEP 1 Setting Up the Machine in the Quick Setup Guide. Put the supplied CD-ROM into your CD-ROM drive. If the model name screen appears, choose your machine. If the language screen appears, choose your language. Windows® Network Note Please close any applications running before installing MFL-Pro Suite.
Installing the Driver & Software 8 After reading and accepting the ScanSoft™ PaperPort™ 11SE License Agreement, click Yes. Note If the machine is not yet configured for use on your network, the following screen appears. Click OK. The Configure IP Address window will appear. Enter an IP address for your machine that is suitable for your network by following the on-screen instructions.
STEP 2 Installing the Driver & Software 13 Click Finish to restart your computer. Windows® Network After restarting the computer, you must be logged on with Administrator rights. The MFL-Pro Suite has been installed completely. Note MFL-Pro Suite includes the Printer Driver, Scanner Driver, Brother ControlCenter3, ScanSoft™ PaperPort™ 11SE. ScanSoft™ PaperPort™ 11SE is a document management application for scanning and viewing documents.
For Network Users 1 1 BRAdmin Light utility BRAdmin Light is a utility for initial setup of Brother network connected devices. It can also search for Brother products on your network, view the status and configure basic network settings, such as IP address. For more information on BRAdmin Light, visit us at http://solutions.brother.com/. Note If you require more advanced printer management, use the latest Brother BRAdmin Professional utility version that is available as a download from http://solutions.
For Network Users Setting your IP address, Subnet Mask and Gateway using BRAdmin Light Note 3 If you have a DHCP/BOOTP/RARP server in your network, you don’t have to do the following operation. The machine will automatically obtain its own IP address. 1 2 12 Choose STATIC for the Boot Method. Enter the IP Address, Subnet Mask and Gateway, and then click OK. Start BRAdmin Light. It will search for new devices automatically. Double-click the unconfigured device.
Other Information 1 1 ScanSoft™ PaperPort™ 11SE with OCR by NUANCE™ ScanSoft™ PaperPort™ 11SE for Brother is a document management application. You can use PaperPort™ 11SE to view scanned documents. PaperPort™ 11SE has a sophisticated, yet easy-to-use filing system that will help you organize your graphics and text documents. It allows you to mix or ‘stack’ documents of different formats for printing, faxing or filing.
Other Information Computer requirements 2 Minimum System Requirements and Supported PC Software Functions Operating Supported Functions Minimum Processor Minimum RAM Recommended RAM Required Hard Disk Space For Drivers For Applications Printing, Scanning, PC-FAX 2 Intel® Pentium® 4 or equivalent 64-bit (Intel® 64 or AMD64) supported CPU 512 MB 1 GB 500 MB 500 MB Vista® Windows® 7 Printing, Scanning, Intel® Pentium® 4 or equivalent 1 GB (32-bit) 2 GB (64-bit) 1 GB (32-bit) 2 GB (64-bit)
Trademarks The Brother logo is a registered trademark of Brother Industries, Ltd. Microsoft and Windows are registered trademarks of Microsoft Corporation in the United States and/or other countries. Windows Vista is either a registered trademark or trademark of Microsoft Corporation in the United States and/or other countries. Nuance, the Nuance logo, PaperPort and ScanSoft are trademarks or registered trademarks of Nuance Communications, Inc. or its affiliates in the United States and/or other countries.
UK/IRE/GEN/ASA/OCE