
User Manual


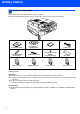
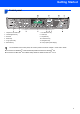


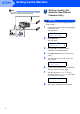
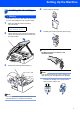

Table Of Contents
- Quick Setup Guide MFC-640CW
- Table of Contents
- Getting Started
- STEP1 Setting Up the Machine
- 1 Removing the protective parts
- 2 Installing the handset
- 3 Loading paper
- 4 Installing the phone line and power cord
- 5 Set Your Country (For Australia / New Zealand Customer Only)
- 6 Installing the ink cartridges
- 7 Print quality check
- 8 Setting the date and time
- 9 Setting your station ID
- 10 Choosing a Receive Mode
- 11 Setting up the TAD
- STEP2 Installing the Driver & Software
- For Network Users
- Consumables and Options
- brother ARL/ASA/NZ

Setting Up the Machine
4
STEP1
1
1 Removing the protective
parts
1 Remove the protective tape and scanner glass
protection sheet.
Improper Setup
DO NOT connect the USB cable. Connecting
the USB cable is done during the software
installation process.
2 Installing the handset
1 Connect the curled handset cord to the
handset.
3 Loading paper
You can load up to 100 sheets of 80 g/m
2
(20 lb) paper.
For details, see About paper in Chapter 1 of
the User’s Guide.
1 Pull the paper tray completely out of the
machine and remove the output paper tray (1).
2 Press and slide the paper guide (1) to fit the
paper width.
3 Pull out the paper support (1) and unfold the
paper support flap (2).
Note
Use the paper support flap for Letter, Legal and A4
paper.
11
11
1
2