
User Manual

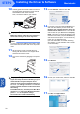
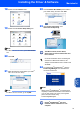
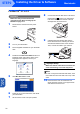


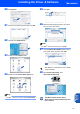
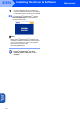
Table Of Contents
- Quick Setup Guide MFC-640CW
- Table of Contents
- Getting Started
- STEP1 Setting Up the Machine
- 1 Removing the protective parts
- 2 Installing the handset
- 3 Loading paper
- 4 Installing the phone line and power cord
- 5 Set Your Country (For Australia / New Zealand Customer Only)
- 6 Installing the ink cartridges
- 7 Print quality check
- 8 Setting the date and time
- 9 Setting your station ID
- 10 Choosing a Receive Mode
- 11 Setting up the TAD
- STEP2 Installing the Driver & Software
- For Network Users
- Consumables and Options
- brother ARL/ASA/NZ

Installing the Driver & Software
32
STEP2
Macintosh
®
Wired
Network
Macintosh
®
For Mac OS
®
9.1 to 9.2
Important
Make sure that you have finished the
instructions from Step 1 Setting Up the
Machine on page 4-11.
1 Disconnect the machine from the power
socket.
2 Turn on your Macintosh
®
.
3 Put the supplied CD-ROM into your CD-ROM
drive.
4 Double-click the Start Here OS 9.1-9.2 icon to
install the printer and scanner drivers. If the
language screen appears, choose your
language.
5 Click MFL-Pro Suite to install.
6 Follow the on-screen instructions, and restart
your Macintosh
®
.
7 Lift the scanner cover to its open position.
8 Connect the network cable to the LAN socket
marked with a symbol. You will find the
LAN socket above and to the left of the ink
cartridge slots, as shown below.
9 Carefully guide the network cable into the
trench as shown below, following the trench
around and toward the back of the machine.
Then, connect the cable to your network.
Improper Setup
Make sure that the cable does not restrict the
cover from closing, or an error may occur.
Note
In case of using both USB and LAN cables, route
both cables into the trench with one on top of the
other.
10 Lift the scanner cover to release the lock.
Gently push the scanner cover support down
and close the scanner cover.