
User Manual


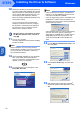


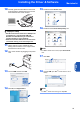


Table Of Contents
- Quick Setup Guide MFC-640CW
- Table of Contents
- Getting Started
- STEP1 Setting Up the Machine
- 1 Removing the protective parts
- 2 Installing the handset
- 3 Loading paper
- 4 Installing the phone line and power cord
- 5 Set Your Country (For Australia / New Zealand Customer Only)
- 6 Installing the ink cartridges
- 7 Print quality check
- 8 Setting the date and time
- 9 Setting your station ID
- 10 Choosing a Receive Mode
- 11 Setting up the TAD
- STEP2 Installing the Driver & Software
- For Network Users
- Consumables and Options
- brother ARL/ASA/NZ

Installing the Driver & Software
28
STEP2
Macintosh
®
USB
Macintosh
®
12 From the Apple
®
menu, click Chooser.
13 Click the Brother Ink icon.
On the right side of the Chooser, choose the
machine to which you want to print.
Close the Chooser.
The Brother printer driver and scanner
driver have been installed.
Note
ControlCenter2 is not supported in Mac OS
®
9.x.
14 To install Presto!
®
PageManager
®
, click the
Presto! PageManager icon and follow the
on-screen instructions.
Note
You can easily scan, share and organize photos
and documents using Presto!
®
PageManager
®
.
Presto!
®
PageManager
®
has been
installed and the installation is now
complete.