
User Manual

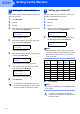

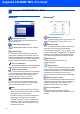

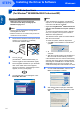
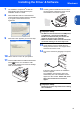
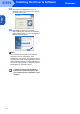

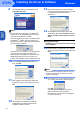
Table Of Contents
- Quick Setup Guide MFC-640CW
- Table of Contents
- Getting Started
- STEP1 Setting Up the Machine
- 1 Removing the protective parts
- 2 Installing the handset
- 3 Loading paper
- 4 Installing the phone line and power cord
- 5 Set Your Country (For Australia / New Zealand Customer Only)
- 6 Installing the ink cartridges
- 7 Print quality check
- 8 Setting the date and time
- 9 Setting your station ID
- 10 Choosing a Receive Mode
- 11 Setting up the TAD
- STEP2 Installing the Driver & Software
- For Network Users
- Consumables and Options
- brother ARL/ASA/NZ

Setting Up the Machine
11
10 Choosing a Receive Mode
There are three possible receive modes: Fax Only,
Fax/Tel and Manual.
1 Press Menu/Set.
2 Press 0.
3 Press 1.
4 Press a or b to choose the mode.
5 Press Menu/Set.
6 Press Stop/Exit.
For details, see Setup Receive in Chapter 4
of the User’s Guide.
11 Setting up the TAD
You must record an outgoing message in order to use
the TAD mode.
1 Record the TAD Outgoing Message (MSG
CTR OGM).
See Recording TAD Outgoing Message in
Chapter 7 of the User’s Guide.
2 Activate TAD mode.
Press and hold until it lights and the LCD
shows:
If the TAD Mode is on, it overrides your
Receive Mode setting. The built-in digital
TAD answers voice calls. If the call is a fax,
you can receive a fax automatically.
For details, see TAD in Chapter 7 of the
User’s Guide.
Now go to
For details, see TAD in Chapter 7 of the
User’s Guide.
Youcontrolthephoneline
andmustanswerevery
callyourself.
Doyouwantto
receiveafax
automatically?
Manual
Yourmachineautomatically
answerseverycallasafax.
Fax Only
Yourmachinecontrolsthe
lineandautomatically
answerseverycall.Ifthe
callisnotafax,itwillring
foryoutopickupthecall.
Fax/Tel
Yes
No
Doyouuseyour
machineforfaxes
only?
No
Yes
TAD:Msg Mgr