
Owner manual


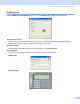
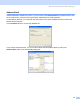
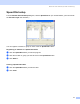
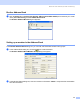

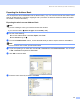
Table Of Contents
- SOFTWARE USER’S GUIDE
- Table of Contents
- Section I Windows®
- 1 Printing
- 2 Scanning
- Scanning a document using the TWAIN driver
- Scanning a document using the WIA driver (For Windows® XP only)
- Using the Scan key (For USB cable users)
- Using ScanSoft® PaperPort® 9.0SE and OmniPage® OCR
- 3 ControlCenter2
- 4 Network Scanning (For models with built-in network support)
- 5 Remote Setup (Not available for DCP models)
- 6 Brother PC-FAX Software (For MFC models only)
- PC-FAX sending
- Speed Dial setup
- Brother Address Book
- Setting up a member in the Address Book
- Setting up a group for broadcasting
- Editing member information
- Deleting a member or group
- Exporting the Address Book
- Importing to the Address Book
- Setting up a cover page
- Entering cover page information
- Sending a file as a PC-FAX using the Facsimile style user interface
- Sending a file as a PC-FAX using the Simple style user interface
- PC-FAX receiving (MFC-640CW and MFC-820CW only)
- 7 PhotoCapture Center™
- Section II Apple® Macintosh®
- 8 Printing and Faxing
- 9 Scanning
- 10 ControlCenter2
- 11 Network Scanning (For models with built-in network support)
- 12 Remote Setup & PhotoCapture Center™
- Index
- brother USA

Brother PC-FAX Software (For MFC models only)
83
Setting up a group for broadcasting 6
You can create a group to send the same PC-FAX to several recipients at one time.
a In the Brother Address Book dialog box, click the icon to create a Group.
The Brother Address Book Group Setup dialog box appears:
b Enter the name of the new group in the Group Name field.
c In the Available Names box, choose each member to be included in the group, and then click Add >>.
Members added to the group appear in the Group Members box.
d After all the members you want have been added, click OK.
Note
You can have up to 50 members in a group.
Editing member information 6
a Choose the member or group you want to edit.
b Click the edit icon.
c Change the member or group information.
d Click OK.
Deleting a member or group 6
a Choose the member or group you want to delete.
b Click the delete icon.
c When the ConfirmItemDelete dialog box appears, click OK.