
Owner manual


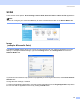
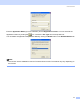


Table Of Contents
- SOFTWARE USER’S GUIDE
- Table of Contents
- Section I Windows®
- 1 Printing
- 2 Scanning
- Scanning a document using the TWAIN driver
- Scanning a document using the WIA driver (For Windows® XP only)
- Using the Scan key (For USB cable users)
- Using ScanSoft® PaperPort® 9.0SE and OmniPage® OCR
- 3 ControlCenter2
- 4 Network Scanning (For models with built-in network support)
- 5 Remote Setup (Not available for DCP models)
- 6 Brother PC-FAX Software (For MFC models only)
- PC-FAX sending
- Speed Dial setup
- Brother Address Book
- Setting up a member in the Address Book
- Setting up a group for broadcasting
- Editing member information
- Deleting a member or group
- Exporting the Address Book
- Importing to the Address Book
- Setting up a cover page
- Entering cover page information
- Sending a file as a PC-FAX using the Facsimile style user interface
- Sending a file as a PC-FAX using the Simple style user interface
- PC-FAX receiving (MFC-640CW and MFC-820CW only)
- 7 PhotoCapture Center™
- Section II Apple® Macintosh®
- 8 Printing and Faxing
- 9 Scanning
- 10 ControlCenter2
- 11 Network Scanning (For models with built-in network support)
- 12 Remote Setup & PhotoCapture Center™
- Index
- brother USA

Scanning
45
You can import items from other applications 2
As well as scanning items, you can bring items into PaperPort
®
9.0SE in a variety of ways and convert them
to PaperPort
®
9.0SE (MAX) files in several different ways:
Print to the Desktop View from another application, such as Microsoft
®
Excel.
Import files saved in other file formats, such as Windows
®
Bitmap (BMP) or Tagged Image File Format
(TIFF).
You can export items into other formats 2
You can export or save PaperPort
®
9.0SE items in several popular file formats, such as BMP, JPEG, TIFF,
PDF or self-viewing.
Exporting an image file 2
a Click File, then Save As in the PaperPort
®
9.0SE window.
The Save ‘XXXXX’ as dialog box is displayed.
b Choose the drive and folder where you want to store the file.
c Enter the new file name and choose the file type or choose a name from the File Name text box. (You
can scroll through the Directories and File Name listing for prompting.)
d Click Save to save your file, or Cancel to return to the PaperPort
®
9.0SE without saving it.
Uninstalling PaperPort
®
9.0SE and ScanSoft
®
OmniPage
®
OCR 2
For Windows
®
98/98SE and Windows
®
Me 2
a Click the Start button, Settings, Control Panel, Add/Remove Programs, and click the
Install/Uninstall tab.
b Choose PaperPort from the list and click Add/Remove.
For Windows
®
2000 Professional 2
a Click the Start button, Settings, Control Panel, then Add/Remove Programs.
b Choose PaperPort from the list and click Change or Remove.
For Windows
®
XP 2
a Click the Start button, Control Panel, Add or Remove Programs, and click the
Change or Remove Programs icon.
b Choose PaperPort from the list and click Change or Remove.