
Owner manual
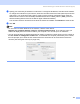

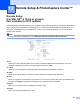


Table Of Contents
- SOFTWARE USER’S GUIDE
- Table of Contents
- Section I Windows®
- 1 Printing
- 2 Scanning
- Scanning a document using the TWAIN driver
- Scanning a document using the WIA driver (For Windows® XP only)
- Using the Scan key (For USB cable users)
- Using ScanSoft® PaperPort® 9.0SE and OmniPage® OCR
- 3 ControlCenter2
- 4 Network Scanning (For models with built-in network support)
- 5 Remote Setup (Not available for DCP models)
- 6 Brother PC-FAX Software (For MFC models only)
- PC-FAX sending
- Speed Dial setup
- Brother Address Book
- Setting up a member in the Address Book
- Setting up a group for broadcasting
- Editing member information
- Deleting a member or group
- Exporting the Address Book
- Importing to the Address Book
- Setting up a cover page
- Entering cover page information
- Sending a file as a PC-FAX using the Facsimile style user interface
- Sending a file as a PC-FAX using the Simple style user interface
- PC-FAX receiving (MFC-640CW and MFC-820CW only)
- 7 PhotoCapture Center™
- Section II Apple® Macintosh®
- 8 Printing and Faxing
- 9 Scanning
- 10 ControlCenter2
- 11 Network Scanning (For models with built-in network support)
- 12 Remote Setup & PhotoCapture Center™
- Index
- brother USA

Remote Setup & PhotoCapture Center™
150
Note
• To save a setting, highlight setting (for example, Set Quick-Dial) from the setting list then click Export.
Each setting you export is saved as a single file.
• If you need to change the machine that was registered to your Macintosh
®
during the installation of
MFL-Pro Suite (see the Quick Setup Guide), or if the network environment was changed, you need to
specify the new machine. Open the DeviceSelector and choose the new machine. (For network users
only)
PhotoCapture Center™ 12
You can access a Media Card installed in the machine from a Macintosh
®
.
CAUTION
DO NOT start your Macintosh
®
with a media card installed in the media drive of the machine. You could
lose your data or damage the card.
For USB cable users 12
a Put a SmartMedia
®
, CompactFlash
®
, Memory Stick
® 1
, Memory Stick Pro ™
2
, MultiMediaCard™,
SecureDigital™ or xD-Picture Card™
1
into your machine.
The Removable Disk icon appears on the Desktop.
1
This product also supports CompactFlash
®
type1 and xD-Picture Card™ type M (Large Capacity).
2
A MagicGate Memory Stick
®
can be used, but any music data that is stored on the stick cannot be read.
Note
If you create a name for the volume level of the media card, the name appears instead of
‘Removable Disk’.
b Double-click the Removable Disk icon. The files and folders on the media card appear on your screen.