
Owner manual


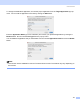

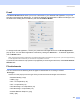

Table Of Contents
- SOFTWARE USER’S GUIDE
- Table of Contents
- Section I Windows®
- 1 Printing
- 2 Scanning
- Scanning a document using the TWAIN driver
- Scanning a document using the WIA driver (For Windows® XP only)
- Using the Scan key (For USB cable users)
- Using ScanSoft® PaperPort® 9.0SE and OmniPage® OCR
- 3 ControlCenter2
- 4 Network Scanning (For models with built-in network support)
- 5 Remote Setup (Not available for DCP models)
- 6 Brother PC-FAX Software (For MFC models only)
- PC-FAX sending
- Speed Dial setup
- Brother Address Book
- Setting up a member in the Address Book
- Setting up a group for broadcasting
- Editing member information
- Deleting a member or group
- Exporting the Address Book
- Importing to the Address Book
- Setting up a cover page
- Entering cover page information
- Sending a file as a PC-FAX using the Facsimile style user interface
- Sending a file as a PC-FAX using the Simple style user interface
- PC-FAX receiving (MFC-640CW and MFC-820CW only)
- 7 PhotoCapture Center™
- Section II Apple® Macintosh®
- 8 Printing and Faxing
- 9 Scanning
- 10 ControlCenter2
- 11 Network Scanning (For models with built-in network support)
- 12 Remote Setup & PhotoCapture Center™
- Index
- brother USA

ControlCenter2
130
SCAN 10
There are four buttons for the Scan to Image, Scan to OCR, Scan to E-mail and Scan to File applications.
Note
You can configure your machine’s Scan key for each ControlCenter2 button in the Device Button tab.
Image
(example: Apple
®
PreView) 10
The Scan to Image feature allows you to scan an image directly into your graphics application for image
editing. To change the default settings, click the button while holding down the Ctrl key and choose
Software Button.
If you want to scan and then crop a portion of a page after pre-scanning the document, check Show Scanner
Interface box.
Change the other settings, if needed.