
Manual
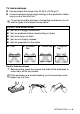


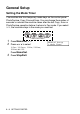

Table Of Contents
- USER’S GUIDE MFC-640CW
- Brother numbers
- Ordering accessories and supplies
- Safety precautions
- Choosing a location
- Quick Reference Guide
- How to access the complete User’s Guide
- How to access Brother Support (For Windows®)
- Table of Contents
- 1 Introduction
- 2 Getting started
- Initial Setup
- General Setup
- Setting the Mode Timer
- Setting the Paper Type
- Setting the Paper Size
- Setting the Ring Volume
- Setting the Beeper Volume
- Setting the Speaker Volume
- Setting the Handset Volume
- Choosing the Handset Volume (For Volume Amplify)
- Setting Volume Amplify
- Turning on Automatic Daylight Savings Time
- Setting the LCD Contrast
- 3 Setup Send
- 4 Setup Receive
- Basic receiving operations
- 5 Quick-Dial numbers and dialing options
- 6 Remote Fax Options (Black & White only)
- 7 Message Center
- Message Center mode
- Setting up the Message Center
- Recording Message Center Outgoing Message
- Activating Message Center mode
- Message indicator
- Playing voice messages
- Printing a fax message
- Erasing incoming messages
- Setting Maximum Time for incoming messages
- Setting Toll Saver
- ICM Recording Monitor
- Recording a conversation
- Record Fax/Tel Outgoing Announcement (F/T OGM)
- Message Center mode
- 8 Printing reports
- 9 Making copies
- 10 Walk-Up PhotoCapture Center™
- 11 Software and Network features
- 12 Important information
- 13 Troubleshooting and routine maintenance
- Appendix A
- Appendix B
- Glossary
- Specifications
- Index
- Remote Retrieval Access card
- brother US/CAN

2 - 1 GETTING STARTED
2
Initial Setup
Setting the Date and Time
When the machine is not in use it will display the date and time. If you
set up the Station ID the date and time displayed by your machine will
be printed on every fax you send. If there is a power failure, you may
have to reset the date and time. No other settings will be affected.
1
Press Menu/Set, 0, 2.
2
Enter the last two digits of the year.
Press
Menu/Set.
3
Enter two digits for the month.
Press
Menu/Set.
(For example, enter 09 for September, or 10 for October.)
4
Enter two digits for the day.
Press
Menu/Set. (For example, enter 06 for 6th.)
5
Enter the time in 24-Hour format.
Press
Menu/Set. (For example, enter 15:25 for 3:25 P.M.)
6
Press Stop/Exit.
The LCD now shows the date and time whenever the machine
is in Fax mode.
Setting Tone and Pulse dialing mode
Your machine comes set for Tone dialing service. If you have Pulse
dialing service (rotary), you need to change the dialing mode.
1
Press Menu/Set, 0, 4.
2
Press
▲ or ▼ to select Pulse (or
Tone).
Press
Menu/Set.
3
Press Stop/Exit.
Getting started
Initial Setup
2.Date/Time
Initial Setup
4.Tone/Pulse