
Manual

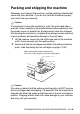
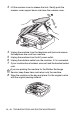
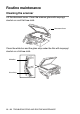

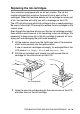
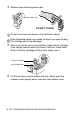
Table Of Contents
- USER’S GUIDE MFC-640CW
- Brother numbers
- Ordering accessories and supplies
- Safety precautions
- Choosing a location
- Quick Reference Guide
- How to access the complete User’s Guide
- How to access Brother Support (For Windows®)
- Table of Contents
- 1 Introduction
- 2 Getting started
- Initial Setup
- General Setup
- Setting the Mode Timer
- Setting the Paper Type
- Setting the Paper Size
- Setting the Ring Volume
- Setting the Beeper Volume
- Setting the Speaker Volume
- Setting the Handset Volume
- Choosing the Handset Volume (For Volume Amplify)
- Setting Volume Amplify
- Turning on Automatic Daylight Savings Time
- Setting the LCD Contrast
- 3 Setup Send
- 4 Setup Receive
- Basic receiving operations
- 5 Quick-Dial numbers and dialing options
- 6 Remote Fax Options (Black & White only)
- 7 Message Center
- Message Center mode
- Setting up the Message Center
- Recording Message Center Outgoing Message
- Activating Message Center mode
- Message indicator
- Playing voice messages
- Printing a fax message
- Erasing incoming messages
- Setting Maximum Time for incoming messages
- Setting Toll Saver
- ICM Recording Monitor
- Recording a conversation
- Record Fax/Tel Outgoing Announcement (F/T OGM)
- Message Center mode
- 8 Printing reports
- 9 Making copies
- 10 Walk-Up PhotoCapture Center™
- 11 Software and Network features
- 12 Important information
- 13 Troubleshooting and routine maintenance
- Appendix A
- Appendix B
- Glossary
- Specifications
- Index
- Remote Retrieval Access card
- brother US/CAN

TROUBLESHOOTING AND ROUTINE MAINTENANCE 13 - 20
Packing and shipping the machine
Whenever you transport the machine, use the packing materials that
came with your machine. If you do not pack the machine properly,
you could void your warranty.
Caution
It is important to allow the machine to ‘park’ the print head after a
print job. Listen carefully to the machine before disconnecting it from
the power source to ensure that all mechanical noise has stopped.
Not allowing the machine to complete this parking process may lead
to print problems and possible damage to the print head.
1
Lift the scanner cover from the right-hand side of the machine
until it locks securely into the open position.
2
Remove all the ink cartridges and attach the yellow protective
parts. (See Replacing the ink cartridges on page 13-26.)
Caution
If you are not able to find the yellow protective parts, do NOT remove
the ink cartridges before shipping. It is essential that the machine be
shipped with either the yellow protective parts or the ink cartridges in
position. Shipping without them will cause damage to your machine
and may void your warranty.
When attaching the yellow protective parts,
make sure it clips into place as shown in the diagram.