
Manual

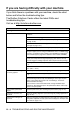

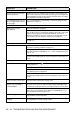
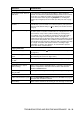

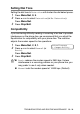


Table Of Contents
- USER’S GUIDE MFC-640CW
- Brother numbers
- Ordering accessories and supplies
- Safety precautions
- Choosing a location
- Quick Reference Guide
- How to access the complete User’s Guide
- How to access Brother Support (For Windows®)
- Table of Contents
- 1 Introduction
- 2 Getting started
- Initial Setup
- General Setup
- Setting the Mode Timer
- Setting the Paper Type
- Setting the Paper Size
- Setting the Ring Volume
- Setting the Beeper Volume
- Setting the Speaker Volume
- Setting the Handset Volume
- Choosing the Handset Volume (For Volume Amplify)
- Setting Volume Amplify
- Turning on Automatic Daylight Savings Time
- Setting the LCD Contrast
- 3 Setup Send
- 4 Setup Receive
- Basic receiving operations
- 5 Quick-Dial numbers and dialing options
- 6 Remote Fax Options (Black & White only)
- 7 Message Center
- Message Center mode
- Setting up the Message Center
- Recording Message Center Outgoing Message
- Activating Message Center mode
- Message indicator
- Playing voice messages
- Printing a fax message
- Erasing incoming messages
- Setting Maximum Time for incoming messages
- Setting Toll Saver
- ICM Recording Monitor
- Recording a conversation
- Record Fax/Tel Outgoing Announcement (F/T OGM)
- Message Center mode
- 8 Printing reports
- 9 Making copies
- 10 Walk-Up PhotoCapture Center™
- 11 Software and Network features
- 12 Important information
- 13 Troubleshooting and routine maintenance
- Appendix A
- Appendix B
- Glossary
- Specifications
- Index
- Remote Retrieval Access card
- brother US/CAN

13 - 11 TROUBLESHOOTING AND ROUTINE MAINTENANCE
Printing Received Faxes (Continued)
Received color fax prints only
in black and white.
Replace the color ink cartridges that are empty or nearly empty, and
then ask the other person to send the color fax again. (See Replacing
the ink cartridges on page 13-26.) Check that Fax Storage is set to OFF.
(See Setting Fax Storage on page 6-3.)
Left and Right margins are cut
off or a single page is printed
on two pages.
Turn on Auto Reduction. (See Printing a reduced incoming fax (Auto
Reduction) on page 4-7.)
Phone Line or Connections
Dialing does not work.
(No dial tone)
Check the machine is plugged in.
Check for a dial tone. If possible, call your machine to hear it answer. If
there is still no answer, check that the telephone line cord is connected
to the jack on the machine labeled LINE and make sure that all
telephone connections are secure. If there is no ringing when you call
your machine, ask your telephone company to check the line.
Change Tone/Pulse setting. (See Setting Tone and Pulse dialing mode
on page 2-1.)
Receiving Faxes
Machine cannot receive a fax Make sure the machine is in the correct receive mode for your setup.
(See Basic receiving operations on page 4-1.)
If you frequently encounter interference on the phone line, try changing
the menu setting of Compatibility to Basic. (See Setting Dial Tone on
page 13-14.)
Check that the telephone line cord is connected to the jack on the
machine labeled LINE and make sure that all telephone connections are
secure.
Sending Faxes
Machine cannot send a fax Make sure that the Fax key is illuminated. (See How to enter Fax
mode on page 3-1.)
Ask the other party to check that receiving machine has paper.
Print the Transmission Verification Report and check for an error.
(See Printing reports on page 8-3.)
Check that the telephone line cord is connected to the jack on the
machine labeled LINE and make sure that all telephone connections are
secure.
Machine cannot send multiple
pages from the scanner glass
Make sure that Real Time Transmission is set to On.
(See Real Time Transmission on page 3-10)
Transmission Verification
Report says ‘Result:NG’ or
‘Result:ERROR’.
There is probably temporary noise or static on the line. Try sending the
fax again. If you send a PC FAX message and get ‘Result:NG’ on the
Transmission Verification Report, your machine may be out of memory.
If you frequently get transmission error with possible interference on the
phone line, try to change the menu setting of Compatibility to Basic.
(See Setting Dial Tone on page 13-14.)
Poor sending quality. Try changing your resolution to Fine or S.Fine. Make a copy to check
your machine’s scanner operation.
Vertical black lines when
sending.
If the copy you made shows the same problem, your scanner is dirty.
(See Cleaning the scanner on page 13-23.)
DIFFICULTY SUGGESTIONS