
User Manual


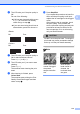


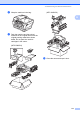

Table Of Contents
- USER’S GUIDE MFC-5890CN MFC-6490CW
- Approval Information and Compilation and Publication Notice
- Table of Contents
- Section I: General
- 1 General Information
- 2 Loading paper and documents
- 3 General setup
- 4 Security features
- Section II: Fax
- 5 Sending a Fax
- Entering Fax mode
- Broadcasting (Monochrome only)
- Additional sending operations
- Sending faxes using multiple settings
- Contrast
- Changing fax resolution
- Dual access (Monochrome only)
- Real time transmission
- Overseas Mode
- Delayed Faxing (Monochrome only)
- Delayed Batch Transmission (Monochrome only)
- Checking and cancelling waiting jobs
- Setting your changes as a new default
- Restoring all settings to the factory settings
- Sending a fax manually
- Out of Memory message
- 6 Receiving a Fax
- 7 Telephone and External devices
- Voice operations
- Telephone Service for Australia
- Telephone Service for New Zealand
- Telephone Service for Some Countries
- Connecting an external TAD (telephone answering device)
- External and extension telephones
- 8 Dialling and storing numbers
- 9 Printing Reports
- 10 Polling
- 5 Sending a Fax
- Section III: Copy
- 11 Making copies
- How to copy
- Copy settings
- Changing copy speed and quality
- Enlarging or reducing the image copied
- Making N in 1 copies or a poster (Page Layout)
- Sorting copies using the ADF
- Adjusting Brightness and Contrast
- Paper Options
- Skew Adjustment (MFC-6490CW only)
- Book Copy
- Watermark Copy
- Setting your changes as a new default
- Restoring all settings to the factory settings
- ‘Out of Memory’ message
- 11 Making copies
- Section IV: Direct Photo Printing
- Section V: Software
- Section VI: Appendixes
- A Safety and Legal
- B Troubleshooting and Routine Maintenance
- C Menu and Features
- D Specifications
- E Glossary
- Index
- brother ARL/ASA/NZ

174
Checking the print alignment B
You may need to adjust the print alignment
after transporting the machine, if your printed
text becomes blurred or images become
faded.
a Press Ink Management.
b Press a or b to choose Test Print.
Press OK.
c Press a or b to choose Alignment.
Press OK.
d Press Mono Start or Colour Start.
The machine starts printing the
Alignment Check Sheet.
e Check the 600 dpi and 1200 dpi test
prints to see if number 5 most closely
matches number 0.
f Do one of the following:
If the number 5 samples of both the
600 dpi and 1200 dpi test prints are
the best matches, press 1 (Yes) to
finish the Alignment Check and go to
step i.
If another test print number is a
better match for either 600 dpi or
1200 dpi, press 2 (No) to choose it.
g For 600 dpi, press the number of the test
print that most closely matches the
number 0 sample (1-8).
h For 1200 dpi, press the number of the
test print that most closely matches the
number 0 sample (1-8).
i Press Stop/Exit.
Checking the ink volume B
Although an ink volume icon appears on the
LCD, you can use the Ink Management key
to see a large graph showing the ink that is
left in each cartridge.
a Press Ink Management.
b Press a or b to choose Ink Volume.
Press OK.
The LCD shows the ink volume.
c Press Stop/Exit.
Note
You can check the ink volume from your
computer. (See Printing for Windows
®
or
Printing and Faxing for Macintosh
®
in the
Software User’s Guide on the CD-ROM.)