
User Manual

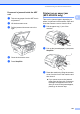


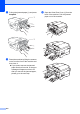


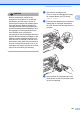
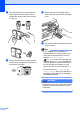
Table Of Contents
- USER’S GUIDE MFC-5890CN MFC-6490CW
- Approval Information and Compilation and Publication Notice
- Table of Contents
- Section I: General
- 1 General Information
- 2 Loading paper and documents
- 3 General setup
- 4 Security features
- Section II: Fax
- 5 Sending a Fax
- Entering Fax mode
- Broadcasting (Monochrome only)
- Additional sending operations
- Sending faxes using multiple settings
- Contrast
- Changing fax resolution
- Dual access (Monochrome only)
- Real time transmission
- Overseas Mode
- Delayed Faxing (Monochrome only)
- Delayed Batch Transmission (Monochrome only)
- Checking and cancelling waiting jobs
- Setting your changes as a new default
- Restoring all settings to the factory settings
- Sending a fax manually
- Out of Memory message
- 6 Receiving a Fax
- 7 Telephone and External devices
- Voice operations
- Telephone Service for Australia
- Telephone Service for New Zealand
- Telephone Service for Some Countries
- Connecting an external TAD (telephone answering device)
- External and extension telephones
- 8 Dialling and storing numbers
- 9 Printing Reports
- 10 Polling
- 5 Sending a Fax
- Section III: Copy
- 11 Making copies
- How to copy
- Copy settings
- Changing copy speed and quality
- Enlarging or reducing the image copied
- Making N in 1 copies or a poster (Page Layout)
- Sorting copies using the ADF
- Adjusting Brightness and Contrast
- Paper Options
- Skew Adjustment (MFC-6490CW only)
- Book Copy
- Watermark Copy
- Setting your changes as a new default
- Restoring all settings to the factory settings
- ‘Out of Memory’ message
- 11 Making copies
- Section IV: Direct Photo Printing
- Section V: Software
- Section VI: Appendixes
- A Safety and Legal
- B Troubleshooting and Routine Maintenance
- C Menu and Features
- D Specifications
- E Glossary
- Index
- brother ARL/ASA/NZ

168
d Turn the green knob on the protective
yellow cap clockwise until it clicks to
release the vacuum seal, then remove
the cap (1).
e Each colour has its own correct position.
Insert the ink cartridge in the direction of
the arrow on the label.
f Gently push the ink cartridge until it
clicks, and then close the ink cartridge
cover.
g The machine will automatically reset the
ink dot counter.
Note
• If you replaced an ink cartridge, for
example Black, the LCD may ask you to
verify that it was a brand new one (for
example, Did You Change
Black). For each new cartridge you
installed, press 1 (Yes) to automatically
reset the ink dot counter for that colour. If
the ink cartridge you installed is not a
brand new one, be sure to press 2 (No).
• If the LCD shows No Cartridge or
Cannot Detect after you install the ink
cartridges, check that the ink cartridges
are installed correctly.
WARNING
If ink gets in your eyes, wash them out with
water at once and call a doctor if you are
concerned.
1
Y
C
B
K