
User Manual

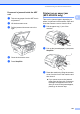


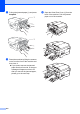


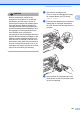
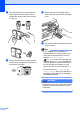
Table Of Contents
- USER’S GUIDE MFC-5890CN MFC-6490CW
- Approval Information and Compilation and Publication Notice
- Table of Contents
- Section I: General
- 1 General Information
- 2 Loading paper and documents
- 3 General setup
- 4 Security features
- Section II: Fax
- 5 Sending a Fax
- Entering Fax mode
- Broadcasting (Monochrome only)
- Additional sending operations
- Sending faxes using multiple settings
- Contrast
- Changing fax resolution
- Dual access (Monochrome only)
- Real time transmission
- Overseas Mode
- Delayed Faxing (Monochrome only)
- Delayed Batch Transmission (Monochrome only)
- Checking and cancelling waiting jobs
- Setting your changes as a new default
- Restoring all settings to the factory settings
- Sending a fax manually
- Out of Memory message
- 6 Receiving a Fax
- 7 Telephone and External devices
- Voice operations
- Telephone Service for Australia
- Telephone Service for New Zealand
- Telephone Service for Some Countries
- Connecting an external TAD (telephone answering device)
- External and extension telephones
- 8 Dialling and storing numbers
- 9 Printing Reports
- 10 Polling
- 5 Sending a Fax
- Section III: Copy
- 11 Making copies
- How to copy
- Copy settings
- Changing copy speed and quality
- Enlarging or reducing the image copied
- Making N in 1 copies or a poster (Page Layout)
- Sorting copies using the ADF
- Adjusting Brightness and Contrast
- Paper Options
- Skew Adjustment (MFC-6490CW only)
- Book Copy
- Watermark Copy
- Setting your changes as a new default
- Restoring all settings to the factory settings
- ‘Out of Memory’ message
- 11 Making copies
- Section IV: Direct Photo Printing
- Section V: Software
- Section VI: Appendixes
- A Safety and Legal
- B Troubleshooting and Routine Maintenance
- C Menu and Features
- D Specifications
- E Glossary
- Index
- brother ARL/ASA/NZ

166
h Gently close the scanner cover (1) using
the finger holds on both sides of it.
WARNING
Be careful not to trap your fingers under the
scanner cover.
Always use the finger holds provided on
both sides of the scanner cover when
opening and closing it.
i Push paper tray #1 and paper tray #2
firmly back into the machine.
Note
Make sure you pull out the paper support
until it clicks.
Routine maintenance B
Replacing the ink cartridges B
Your machine is equipped with an ink dot
counter. The ink dot counter automatically
monitors the level of ink in each of the
4 cartridges. When the machine detects an
ink cartridge is running out of ink, the machine
will tell you with a message on the LCD.
Note
For example, when one of the ink
cartridge is nearly empty, the LCD will
display Ink low (name of colour).
You should purchase a replacement
cartridge in preparation for when the
machine indicates the colour is completely
empty.
When one of the ink cartridge is empty,
the LCD will display Cannot Print or
B&W Print Only.
You should only replace the actual ink
cartridge when this message Cannot
Print or B&W Print Only appears on
the LCD.
The LCD will tell you which ink cartridge is low
or needs replacing. Be sure to follow the LCD
prompts to replace the ink cartridges in the
correct order.
Even though the machine tells you that an ink
cartridge is empty, there will be a small
amount of ink left in the ink cartridge. It is
necessary to keep some ink in the ink
cartridge to prevent air from drying out and
damaging the print head assembly.
1