
User Manual


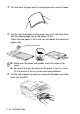

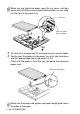
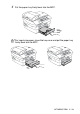
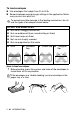
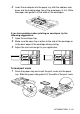
Table Of Contents
- USER’S GUIDE MFC-5440CN/MFC-5840CN
- Brother numbers
- Ordering accessories and supplies
- Safety precautions
- Choosing a location
- Quick Reference Guide
- Table of Contents
- 1 Introduction
- 2 Getting started
- Initial Setup
- General Setup
- Setting the Mode Timer
- Setting the Paper Type
- Setting the Paper Size
- Setting the Ring Volume
- Setting the Beeper Volume
- Setting the Speaker Volume
- Turning on Automatic Daylight Savings Time
- Setting the LCD Contrast
- Setting the Tray Use for Copy mode (MFC-5840CN only)
- Setting the Tray Use for Fax mode (MFC-5840CN only)
- 3 Setup Send
- 4 Setup Receive
- 5 Quick-Dial numbers and dialing options
- 6 Remote Fax Options (Not available for color faxes)
- 7 Printing reports
- 8 Making copies
- 9 Walk-Up PhotoCapture Center™ (MFC-5840CN only)
- 10 Important information
- 11 Troubleshooting and routine maintenance
- Appendix A
- Appendix B
- Glossary
- Specifications
- Index
- Remote Retrieval Access card
- brother USA/CAN

1 - 16 INTRODUCTION
4
Fan the stack of paper well to avoid paper jams and mis-feeds.
5
Gently insert the paper into the paper tray print side face down
and the leading edge (top of the paper) in first.
Check that the paper is flat in the tray and below the maximum
paper mark.
6
Put the output paper tray back on and push the paper tray firmly
back into the MFC.
■
Make sure the paper side guides touch the sides of the
paper.
■
Be careful that you do not push the paper in too far; it may
lift at the back of the tray and cause feed problems.
Maximum Paper Mark